This is the online manual for the Aerodrums air drumming instrument. (エアロドラム説明書 )
Our interactive troubleshooter can be accessed here. 你可以通过点击这里来进入Aerodrums的交互式疑难解答。
In the event that you can’t find what you are looking for, please ask a question on the forum aerodrums.com, or send an email to our support address.
You can open this manual in your browser from Aerodrums by clicking the “Help” button in the home screen, then by pressing the “Online manual” button.
Please note that this manual applies to the latest version of Aerodrums. Mac users can get the latest version here. Windows PC users can check that they are running the latest version by clicking the “Check for Aerodrums updates” link that is located in the Aerodrums group in the Start Menu, or by running the updater.exe program that can be found in the directory where Aerodrums was installed (typically C:\Program Files (x86)\Aerodrums). Please make sure that Aerodrums is not running when checking for updates.
Getting started
This section of the manual covers the few steps required to start drumming with Aerodrums for the first time. If you have followed the instructions from the manual that came in the box, you can skip to the first run section.
Let us go through the different parts that came in the box so that we can introduce some vocabulary:
- Two drum sticks with reflective balls
- Two foam triangles with elastic loops: the “foot markers”
- A USB camera: the “camera”
- A donut shaped lamp with a lens and a USB plug: the “lamp”
- A pair of paper sunglasses
- A safety warning leaflet
- A manual that contains your Aerodrums product key
You will also need:
- A computer (minimum spec. Intel® Core 2 Duo 2GHz ideally with a dedicated graphics card) running one of the following operating systems: Windows Vista, 7, 8, 10 or 11; or Mac OS X 10.6 and up; with 2 gigabytes of free hard disk space and two free USB ports which must support the USB 2.0 protocol
- A one time high speed internet connection to download the Aerodrums software
- A desk or dining table, or any surface of similar height (unless you are using the optional camera stand)
- A seat
Installing the software
Download the Aerodrums installer from this address: aerodrums.com/installer/.
You will need to enter your product key to access the installer and any software updates so keep it safe.
On Windows PC
Make sure you are logged in with a user account that has Administrator privileges and that you have not plugged the camera in yet. Download the installer zip file, extract it, then run the setup application.
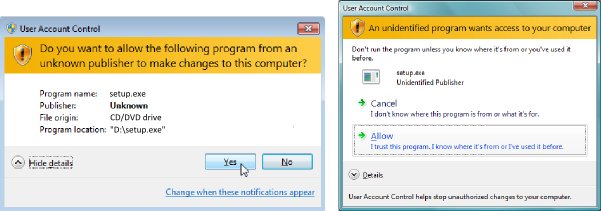
Windows will ask you if you want to allow the setup application to make modifications to your computer, please click ‘Yes’ or ‘Allow’ (see images below). This is required because setup also installs a driver used by Aerodrums to communicate with the camera. If you encounter problems installing the camera driver, please refer to the troubleshooting section of the manual.
The setup application will then install the Aerodrums program. Please follow the instructions given. You will need to enter your product key again during installation.
On Mac
Open the downloaded disk image (.dmg) file and follow the displayed instructions. You will need to enter your product key the first time Aerodrums is run.
Setting up the hardware
Preparing the lamp and the camera
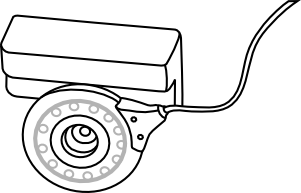
The lamp is designed to be attached to the housing of the camera lens. To do this, insert the housing of the camera lens into the hole at the back of the lamp until you encounter some resistance. Then gently push against this resistance to secure the lamp to the camera. See the drawing below for an illustra-tion of the end result:
During this process, you may notice that the housing of the camera lens can rotate. Once you have attached the lamp to the camera, please ensure that the lamp/lens is fully rotated clockwise when facing towards you (blue dot setting).
You can now plug the lamp into a USB port. Please do not plug the camera in yet. Instead, please wait for the installer to prompt you to do so.
Picking a drumming location
The two requirements for a suitable location to use Aerodrums are that:
- There is enough free space in front of the table (or any surface of similar height, for example a low shelf).
- You have the ability to control the amount of light near your seat.
Aerodrums works by watching you drum through the camera. It understands the location of your drum sticks and feet because they appear brighter than other objects, thanks to the lamp and markers.
For this reason, it is important that the camera cannot see objects that are brighter than the markers. The picture below shows examples of unsuitable objects near your seat.

Here is a video illustrating how to prepare a suitable location for drumming with Aerodrums:
Please note that Aerodrums is not designed to work outdoors in broad daylight.
Placing your camera and seat
The video below illustrates how to place your drumming seat so that the camera has a good view of you. You can also read on and look at the drawings that follow.
If you are left handed, please imagine that drawings 1 and 2 are mirrored, and substitute “right” for “left” in the explanations that follow.

1. Place the camera on the very edge of a standard height desk or dinner table (roughly 72cm or 29 inches), so that the lamp overhangs the table.
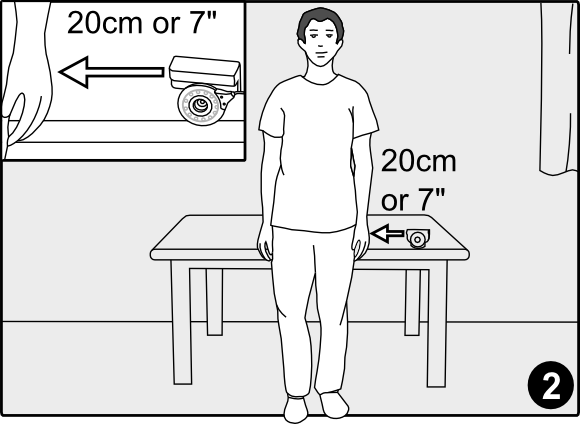
2. Stand against the edge of the table, facing away from it, with your arms at your sides so that the camera is roughly 20cm (7 inches) to the left of your left hand.
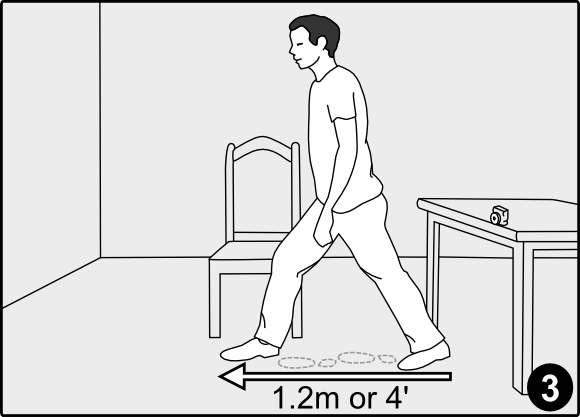
3. Take one big step forward, roughly 1.2m (4 feet) from heel to foot tip. You can also take three small steps, placing your feet at the end of each other.
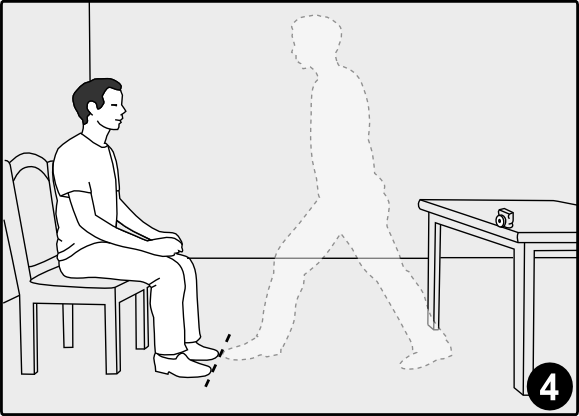
4. Place your seat directly in front of you, facing the table, so that when you are sitting, the tips of your feet are where the tip of your front foot was after the big step.
At this point, please turn the lamp on using the small black switch located where the cable meets the lamp. As regards the lamp, please refer to the safety warning leaflet: we advise that you wear sunglasses when drumming with Aerodrums.
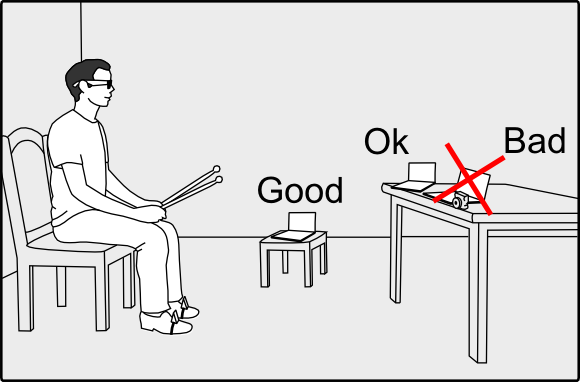
Please place your computer screen away from the camera. If you don’t, the lamp will dazzle you when you look at the screen because it will be in your direct line of sight.
The picture below illustrates good and bad locations for your computer screen:
How to wear the foot markers
Aerodrums is designed to let you operate drum pedals by tapping the ball of your foot (using either heel-up or heel-down technique).
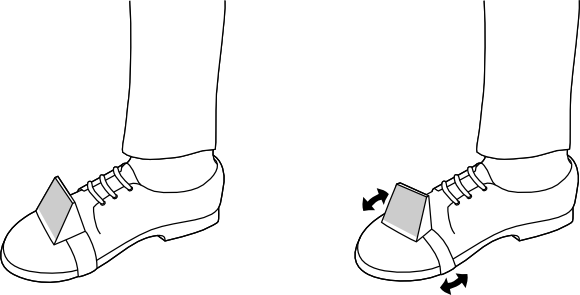
To wear a foot marker, orient it so that the base of the foam wedge is facing down, and the reflective patch faces away from you and towards the camera. Insert your foot into the elastic loop. We recommend that you place the marker as far to the front of your foot as possible, while making sure it is secure enough to not slip off (see drawing below).
If your feet make a wide angle when you play, pivoting the foot markers so that they face towards the camera will help Aerodrums track your feet better.
First run
Latency settings
When you run Aerodrums for the first time, you will see three introduction screens then be asked to pick some settings that pertain to audio latency.
Latency is the time that elapses between the instant when you intend to hit a drum and the instant when the resulting sound can be heard. Your input is required because each computer’s audio hardware is different.
The Configuring latency section of this manual explains the latency settings in detail. After the first run, they can be reached from the home screen by clicking the “Latency” button.
Once you click “Finish” on the latency screen, you will see Aerodrums’ home screen:
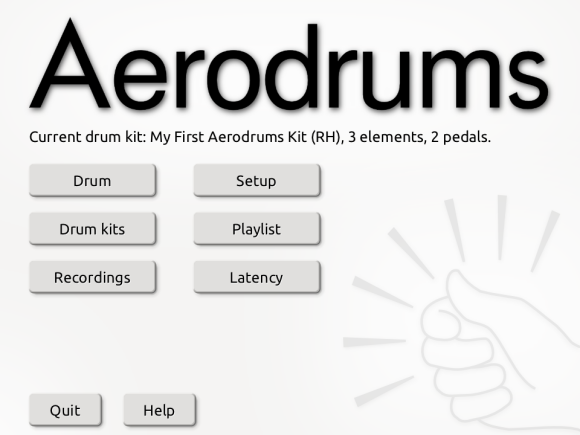
When you click the “Setup” or “Drum” button for the first time, Aerodrums will guide you through the few remaining steps to get drumming. It will ask you if you are left or right handed in order to select the appropriate layout for your first drum kit.
Checking the location and adjusting the camera
You will first see two screens reminding you how to pick a drumming location and how to place your seat with respect to your camera (see above).
Aerodrums will then display what the camera sees, with a drawing of a seated drummer overlayed over the picture. The purpose of this step is to let you aim the camera to achieve a good framing of your seat.
It works by asking you to pan and tilt the camera until the drummer appears seated on your seat. The drawings below illustrate the process. It is important that the drum sticks, the foot markers, and you stay out of sight of the camera during this step.
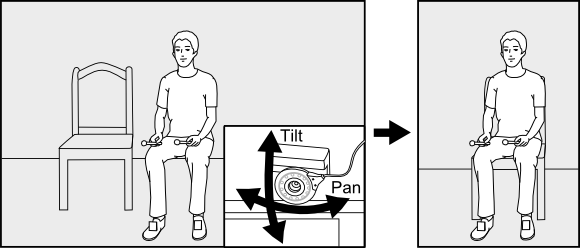
If you notice that your seat is too big or too small for the drummer, please check that you have placed your seat as shown above.
During this process, Aerodrums may display a warning message about brightness and a “Check lighting” button. We recommend that you press it before fine tuning the orientation of the camera.
If there is a problem, areas that are too bright will appear in red. Closing some curtains or blinds and dimming some lights should solve this (click the “Check lighting” button again if it is still there).
If you cannot eliminate the red areas from the picture, you will have to pick a location where you have more control over the light reaching the camera (see above).
The first few times you go through this process, you may find it useful to go to your seat and observe how well your image matches the drawing of the drummer. Of course you may not be the same shape or size as this generic drummer, but if you are able to place your feet where his are, and your image doesn’t feel too big or small compared to him, then your framing is good. Again, if you appear much smaller or bigger than the drawn drummer, you should probably check that you have placed your seat at the right distance from the camera.
Once you have seated the drawn drummer on your seat and clicked “Next”, Aerodrums will check for bright objects. If some are present, they will appear in red. There are three things you can do to address bright objects:
- Remove them from the camera’s field of view.
- Dim the lights or draw blinds or curtains.
- Cover them.
If there are bright objects, you can click “Back” to get a better view of where they are located. Please note that the red areas will not update on this screen. This means that you will need to click “Next” again to check that you have succeeded in removing the bright objects.
Once there are no bright objects, Aerodrums will invite you to take your seat. Make sure that your computer screen is oriented so you can see it from your seat, and don’t forget your drum sticks; and foot markers if you wish to use pedals.
You may notice that there is a “Skip” button on the screen that warns you about bright objects. Please only use this button if you are certain that the objects detected (red areas) correspond to your sticks or your foot markers. This can happen if you have left them in view of the camera during this step (e.g. you left the sticks on your seat).
You are now ready to drum. Your first drum kit is a basic kit with snare, hi-hat and bass drum.
When you want to select a different kit, go back to the home screen by clicking the home icon, then click the “Drum kits” button. You can then choose a different kit from the list of preset kits in the screen that appears. This screen also lets you create your own drum kits. This feature is documented in the making new drum kits section of this manual. When you are done, click “Ok” to return to the home screen.
Last checks
Aerodrums now displays your drum kit and the location of your drum sticks and foot markers (if you are wearing them). Make air drumming gestures at the location of drums or cymbals to hit them. You can find a tutorial video of the stick technique that works best with Aerodrums here.
Here is a screenshot of what you see while drumming:
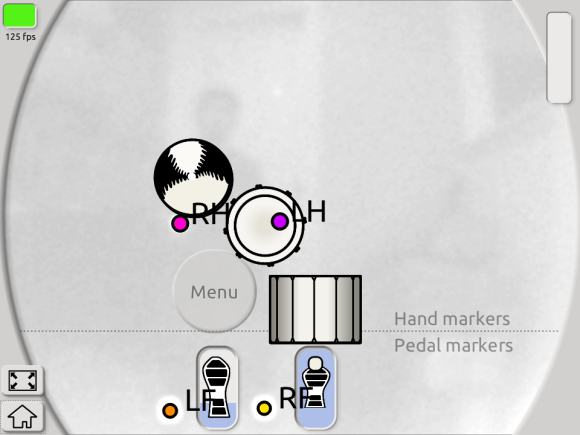
The colored circles represent your sticks (RH, LH) and feet (RF, LF). Notice the dotted line, your sticks should appear above it and your feet below it. If your feet cross this line while operating pedals, we recommend that you adjust your camera and seat again.
In the bottom left of the drumming screen, there are two buttons that you can click with your mouse. The top one toggles full screen display. The bottom one brings you to the home screen.
The kit presets that we provide all contain a snare drum placed at the usual snare location: directly in front of the drummer, slightly above their knees. The height of your seat, your height and your posture can cause the snare (and the whole drum kit with it) to be offset with respect to where you expect it to be.
Usually, nudging your seat by a small amount is enough to place yourself so you can reach the snare comfortably. However, this will not work if you are much taller or smaller than the generic drummer we created the preset drum kits for. (If you are not particularly tall or small, please double check that you have followed the placement and framing instructions above.)
In this case, you will need to place the drums so that they can be reached comfortably, just like you will when you create your own custom kits later on. The drum kit adjustment section explains how to place single drums or all the drums at once.
Drumming menu
When you are drumming, you can perform useful tasks without reaching for your computer. This is done via a menu that you can navigate by making the same air drumming gestures you use to hit your drums.
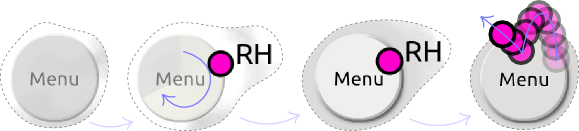
Here is how to enter the drumming menu: Slightly below your snare drum and to the left (right if you are left handed), you will see a faint circular button labeled “Menu”. When you bring one of your sticks over this button, a clockwise swipe animation of the button starts. If you keep your stick over the button long enough (roughly half a second), the animation completes and the button becomes activated: it now appears solid. You can now hit the button by making a firm drumming gesture on it, just like you would to play an accent on the snare for example. The button will remain activated for a while even if your stick leaves it. This lets you make your drumming gesture without worrying about the button de-activating in the process. See the picture below for an illustration:
Some screens of the drumming menu contain sliders. To set a value using a slider, hover over it with one of your sticks to activate it, move your stick horizontally to adjust the value, then move your stick vertically to exit the slider and set it to that value. Here is what an active slider looks like:

The paragraphs below describe the various sections of the drumming menu. Generally, you will encounter two types of screens:
- Screens where you can drum at the same time as adjusting a setting. In those screens, your drum kit is displayed and the menu buttons and sliders appear faint below the hand drums. Before you use the buttons and sliders,
you have to activate them in the same way you did to enter the drumming menu. Leaving your stick long enough on any button or slider will activate all the buttons and sliders. - Screens where you can only interact with the menu items. In those screens, buttons and sliders do not require activation: you can hit or adjust them immediately.
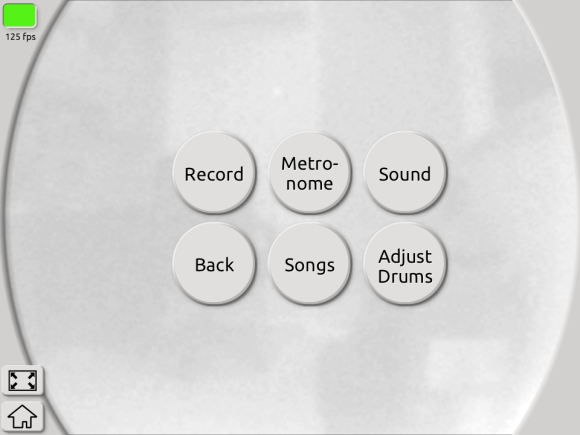
Here is a screenshot of the drumming menu:
On the “Adjust drums” and “Sound” screens of the drumming menu, you will notice a “Save changes” button. It gets highlighted in yellow once you have made changes in any sub-screens. If you want your changes to persist the next time you run Aerodrums, please make sure you hit that button.
Playing songs
Aerodrums keeps track of the last song that you played, if any. To play a song, it must first be in your playlist. You can add mp3 or ogg files to your playlist by clicking the “Playlist” button in the home screen, see picking songs.
To pick a song and start/stop playing it, hit the “Songs” button in the drumming menu.
You can then cycle through the songs in your playlist with the “Previous Song” and “Next Song” buttons. Use the “Play/Stop” button to toggle playback.
If you want to practice a specific part of a song, you can use the “Start time” slider. Each time you hit “Play”, Aerodrums will play the song from that time.
Sometimes you will want to get ready to drum before the song starts playing. Hit the “Play with delay” button to do this. It will bring you back to the drumming screen and there will be a 5 second countdown until the song starts playing.
Metronome
Hit the “Metronome” button in the drumming menu to enter the metronome screen. From here you can start or stop the metronome and set the tempo using the “Tempo” slider.
Volumes, panning and reverb
You can adjust how drums, songs and the metronome are mixed, as well as the master volume and drums panning/reverb, by hitting the “Sound” button.
To change volume levels, hit the “Volume mixing” button to enter the volumes screen. By hitting the volume button to the right of the “Done” button you can cycle between master, drums, song and metronome volumes. The slider to the right of that will adjust the currently selected volume level. As you make modifications you can keep drumming to save you from having to exit this screen.
To change the amount of reverb applied to the drums, hit the “Reverb” button to access a reverb slider.
By hitting the panning button you can alternate between “Center panning” and “Auto panning” modes. Center panning means that the drum samples will be played without any additional panning applied (the samples that are included with Aerodrums are generally panned down the center). Automatic panning means the drums will be panned based on their position relative to where the drummer is seated, e.g. for a standard right-handed kit, the snare drum would be panned down the center, the hi-hat would be panned slightly to the left, the ride cymbal would be panned to the right, etc.
Recording
Aerodrums lets you record your drumming for later use, such as exporting it as a wav file (see Exporting your music).
Hit the “Record” button in the drumming menu to start recording. While recording, the edges of the screen will flash red. Hit the “Stop” button to finish recording.
Each recorded performance will appear in the Recordings menu, reachable from the home screen by clicking the “Recordings” button.
Adjusting drums
While drumming, you can make changes to your drum kit, such as moving a drum or adjusting how it responds to hits. To do so, hit the “Adjust drums” button in the drumming menu.
Please note that you can only do this if the drum kit you are currently playing is not one of the preset kits. If you are using a preset kit, the “Adjust drums” button will be grayed out. To be able to adjust the drum kit, you will need to go back to the home screen, click the “Drum kits” button, create a copy of the current preset by clicking the “Clone” button, then click “Ok” to leave it identical. When you resume drumming with this new drum kit, the “Adjust drums” button will be available.
The next section documents all the adjustments you can make.
Drum kit adjustment
Placing one drum
Use this mode when you are satisfied with the overall configuration of your drum kit, but you want to move one drum or cymbal.
Aerodrums will first ask you to hit the drum or pedal you want to move, then to make an air drumming gesture at its new location. The current drum/pedal being moved is indicated with a yellow halo.
Please note that if you move a drum or cymbal to a very different location, you may have to adjust that drum/cymbal’s response. For example, if a crash cymbal was near you, high and to your left, and you move it far in front of you and to your right, it will now sound much louder when you hit it. (This is because the motion of your drum stick marker now appears much faster to the camera, because it is closer.)
Placing all drums
In this mode, Aerodrums will ask you to place each drum one after the other. Drums that have not been newly placed yet will be drawn faintly at their original location. A yellow halo indicates the current drum or pedal being placed. You can skip drums whose position you want to leave unchanged (activate and hit the “Skip this drum” button). There are two cases where it is expedient to place all the drums at once:
- Aerodrums sometimes misunderstands which drum you intend to hit and you want to fix this.
- You want to experiment with a completely different arrangement of your drums and cymbals.
The first case can happen when you involuntarily place your seat closer to or further from the camera than is expected by the drum kit’s current configuration. It may particularly affect drums that are near each other on the screen, but behind each other in reality, like for example a high tom and a snare. To remedy this, when Aerodrums asks you to place a drum, take care to hit it at the depth (distance from the camera) you intend for it. For example, closer for the snare and further for the high tom. You do not have to change the screen location of any drums, Aerodrums is able to distinguish between near and far drums once reminded of their correct depth. Again, it may need reminding only if your seat or camera placement has changed. For this case, we recommend not skipping any drums. Because Aerodrums can distinguish between near and far drums, it is not a problem if drum icons overlap significantly on the screen.
In the second case, you will probably want to adjust the response of the drums you have moved far from their original location.
Drum response
When you hit a drum, Aerodrums picks an audio sample and a playback volume as a function of how hard you hit the drum. This is what we call drum response. We model it with three parameters:
- Sensitivity: how hard you need to hit the drum in order to hear the loudest sample.
- Volume: how loud that drum will sound compared to the other drums.
- Response curve: the shape of the curve that maps your drum stick or foot speed to the loudness of the sample played.
In this mode, you can adjust the volume and sensitivity of individual drums and pedals at the same time as you drum.
To set the current drum or pedal being adjusted, hit it firmly twice in a row. A yellow halo indicates the current drum or pedal. Hi-hats have a different response for stick and pedal hits; take care to hit the hi-hat twice with a stick to adjust stick response, or with your foot to adjust pedal response.
Aerodrums displays a gauge and graph on the side of the screen. Each time you hit that drum, the speed you hit it with will be displayed on that gauge. This lets you visualize where that hit fell within the sensitivity interval. For example, if it was near the maximum but you feel that you didn’t hit very hard, you may want to decrease the drum’s sensitivity. Use the “Sensitivity” slider for this.
Use the “Volume” slider to adjust how loud the current drum sounds compared to the other drums.
To cycle between the choice of response curves for the current drum, hit the button to the right of the “Done” button. The displayed response curve graph will update as you do this.
Hi-hat and cymbals
This menu gives you access to three screens that let you adjust the range, splash sensitivity and drop clutch setting of your hi-hat(s), as well as the experimental cymbal choking interface
Hi-hat range and splash. On this screen, you can adjust how much your foot must travel to open a hi-hat fully. You can also adjust how sensitive Aerodrums is to the foot motion that indicates hi-hat splashing. This foot motion consists in sharply bringing your foot back up before it reaches the floor, as if you were throwing the pedal board downwards to make it bounce. If your kit contains several hi-hat cymbals, you can select the one whose range and splash sensitivity you want to adjust by hitting it twice to highlight it.
Hi-hat drop clutch. This screen lets you adjust how open a hi-hat is when the foot that actions it is on a different pedal. If your kit contains several hi-hat cymbals, you can select the one whose drop clutch you want to adjust by hitting it twice to highlight it.
Cymbal choking (experimental). Aerodrums lets you choke all your kit’s cymbals (except the hi-hats) by bringing the tip of your sticks inside either of two zones. By default, these zones are located outside of your reach. On this screen, you can use the sliders to bring either zone closer to your kit, so that you can adjust them for comfortable reach if you wish to use this feature.
Picking songs
Click the “Playlist” button in the home screen to edit your playlist.
In the screen that appears, click the “Add” button to browse your computer for an ogg or mp3 file to add to your playlist.
To delete a song from the list, select it then click the “Remove” button.
You can order the songs by seclecting them and clicking the “Move up” or “Move down” buttons.
Use the “Play” button to listen to the selected song.
Exporting your music
Once you have recorded a performance (see recording in the drumming menu), you can listen to it and export it as a wav file. Click the “Recordings” button in the home screen to access these features.
Managing recordings
Aerodrums saves all the recordings that you make in a folder of its own, using a time stamp to name each file.
You can see a list of all recordings that are currently in Aerodrums’ directory. When you select a recording, you can listen to it, rename it or delete it by clicking the corresponding button.
After a while, there could be many recordings (ael files) in the “Recordings” folder located in your Aerodrums installation folder. We recommend that you regularly remove superfluous recordings and to make copies of recordings you wish to keep for later.
Exporting to WAV
You can export the selected recording to a wav file by clicking the “Export wav…” button. If you check the “Incl. song” tick box, the .wav file will include the song that was playing when you recorded, if any. You can also set drum panning to center and disable reverb.
Configuring latency
Click the “Latency” button in the home screen to change the latency settings.
Drum hit sensitivity
These radio buttons determine how sensitive Aerodrums is to subtle air drumming gestures (strictly speaking, they don’t pertain to latency). If you are hearing drum hits when you don’t intend them, change this setting from “Expert” to “Proficient”, or from “Proficient” to “Beginner”.
Audio buffer size
Note to Windows 8 users: Windows 8 has some hardware interaction issues between Bluetooth, WiFi and audio, please see the troubleshooting section for more information.
This setting determines how many audio frames must elapse after a drum hit is detected until the produced sound can start being rendered. How low you can set this value depends on the performance of your computer and on the quality of your sound card and driver. If you set this value below what your audio hardware can handle, you will hear audio glitches while drumming. We invite you to test decreasing values of this setting until you reach the minimum value yielding glitch free audio.
To test your current audio buffer size pick, click the “Apply” button, then the “Test” button. This test is only a guide, you may need to further adjust the audio buffer size if audio glitches occur while drumming.
Audio API
On Windows, Aerodrums supports three modes to drive the audio hardware of your computer:
- “Exclusive WASAPI” gives the lowest audio latency, but prevents other programs from playing any sounds while Aerodrums is running. This is the setting we recommend.
- “Shared WASAPI” gives intermediate audio latency, with the advantage that other programs can play sounds while Aerodrums is running.
- “Windows default” should only be selected if the other settings are greyed out. See the troubleshooting section to understand why that may be the case and how to remedy it.
On Mac, two modes are provided:
- A lower latency option that avoids sampling rate conversion but may restrict other applications from outputting audio. This option will give the best results.
- A higher latency option that will “play nicely” with other applications.
Your choice of a new audio API takes effect when you click the “Apply” button. We recommend that you re-adjust the audio buffer size after changing API (see above).
Manual audio device selection
If your computer is equipped with several audio devices that you use simultaneously in different programs, you can manually select which one you wish Aerodrums to use. To do so, click the “change” button located to the right of the line naming the current audio device.
Making new drum kits
Besides offering some ready made drum kits, Aerodrums lets you compose your own kits, including the customization of drums with your own samples.
Kit composition
In the “Drum kits” screen, there is a “New” button under the drum kit list that lets you create new kits.
In the screen that appears when you click “New”, you can:
- Name the new drum kit (entering a name is necessary to save the new kit, and the name has to be unique).
- Select whether it is a right or left handed kit.
- Add drums or cymbals from the list of available elements: select the element you want to add then click the right arrow button (you can also double click on the element).
- Remove drums or cymbals from the list of chosen elements: select the element you want to remove then click the left arrow button (you can also double click on the element).
A drum kit can contain several identical drums or cymbals.
To save the new drum kit and return to the kit choosing screen, press the “Ok” button.
Instead of composing a new drum kit from scratch, you can use an existing kit as a base: select an existing kit then press the “Clone” button.
You can also edit an existing drum kit: select it then click the “Edit” button. You cannot however edit the presets that came with Aerodrums (including adjusting the drums from the drumming menu).
You can “Clone” the preset first and make your modifications on that copy.
To delete a drum kit, select it then click the “Delete” button. You will be prompted to confirm.
When you create new drum kits, the location of new drums or cymbals will be unknown. When you click “Drum” or “Setup” for the first time with a new kit, Aerodrums will ask you to place each new drum one after the other before you can start drumming. This process is similar to the “Place all drums” feature of the drum kit adjustment menu: you place each drum by making an air drumming gesture at the location where you want it.
Making new drums
When you are in the drum kit editing screen (reached with the “New”, “Clone” or “Edit” buttons in the “Drum kits” screen), you can add new drums or cymbals by clicking the “New” button at the bottom of the “Available elements” list.
In the “New element” screen that appears you can:
- Name the new element (entering a name is necessary to save the new element, and the name has to be unique).
- Browse your computer for a directory containing the sound samples that will be played when that drum or cymbal is hit.
- Use the radio buttons to select what type of drum kit element you are making.
When you press the “Ok” button, Aerodrums will analyze the samples in the directory you provided and package them into an element (.ele) file. The samples will be sorted by increasing loudness (assumed to reflect hit strength), normalized and packed for efficiency. Depending on the number of samples you provide, this process may take some time. A progress bar will be displayed and you will be able to cancel the operation.
Aerodrums expects the samples to be organized in a specific way in the directory that you provide. The expected directory structure depends on the type of the element you are making:
- For all element types except Kick, Hi-hat, Hi-hat Splash, Custom (pedal) and Custom (pedal & sticks), you can place the samples directly in the directory. You can also place the dominant hand samples in a sub-directory named “r”, and the non-dominant hand samples in a “l” directory. Aerodrums supports distinguishing between dominant and non-dominant hand hits.
- For the Hi-hat and Custom (pedal & sticks) elements, Aerodrums expects a directory of samples for each level of openness of the hi-hat. The directory names have to be consecutive letters of the alphabet, with “a” containing the samples for when the hi-hat is fully closed and “b”, “c”, etc containing gradually more open levels. Each of these directories may contain the samples directly, or two sub-directories named “r” and “l” respectively containing samples for the dominant hand and the non-dominant hand. Aerodrums will also attempt to read from a directory named “ped” containing the samples corresponding to pedal hits. (Alternatively, sub-directories of “ped” named “a” and “b” can be used to specify two sets of samples which Aerodrums will alternate between for variation.)
- For the Kick, Hi-hat Splash and Custom (pedal) elements, you can place the samples directly in the directory. Alternatively, if you have two sets of samples corresponding to the same pedal, you can place these in sub-directories named “a” and “b” and Aerodrums will alternate between them.
MIDI
Aerodrums can output MIDI signals. This lets you trigger a MIDI compatible sampler, or record what you drum in a sequencer or Digital Audio Workstation (DAW). For this to work, you will need a software MIDI port to point Aerodrums and your sampler/DAW to. You can think of a software MIDI port as a virtual MIDI cable: it lets you connect programs that are MIDI compatible, where a cable lets you connect MIDI hardware. Creating a software MIDI port is done differently in Mac OS X and Windows.
Creating a software MIDI port in Mac OS X
- Open the Audio MIDI Setup application. (You can type “MIDI” in Spotlight to find it.)
- Click on Window in the menu and select “Show MIDI window”.
- In the window that appears, double click the IAC Bus icon (it has a light red color).
- In the window that opens, tick the “Device is online” checkbox.
Creating a software MIDI port in Windows
Unfortunately, Windows does not have a built-in feature to create a software MIDI port. However there are a number of good virtual MIDI cable programs, some of which are free for non-commercial use. We recommend LoopBe1. It does not require any configuration: just install it and run it. (Depending on your version of Windows, you may have to acknowledge some warnings related to LoopBe1 having been downloaded from the internet and not being signed.)
Pointing Aerodrums to the software MIDI port
Now that you have created the port, you can run Aerodrums and open the MIDI screen (click on the MIDI button in the home screen).
To enable MIDI, select either “MIDI Only” or “MIDI and Sounds”. The former will mute Aerodrums’ drum sounds (and unload all the samples from memory). The latter will keep playing Aerodrums’ drum sounds while sending the corresponding MIDI notes. This is useful, for example, if you want to record a MIDI performance into a DAW while listening to the default Aerodrums samples.
You then have to select the correct MIDI software port to send the notes to. If you have followed the port creation instructions above, on Mac the port will be called “CoreMIDI, IAC Bus #1”; on Windows, it will be called “MMSystem, LoopBe Internal MIDI”.
You can now launch your MIDI compatible program and point it to the same port so that it receives the notes you play in Aerodrums.
Tutorial videos that walk through these steps for Windows and Mac can be viewed here.
Hi-hat setting
You can adjust which MIDI continuous controller (sometimes called CC) Aerodrums uses to send the hi-hat openness information. Some programs expect to receive this via the “Foot pedal” CC (also called CC4), others via the “Modulation wheel” CC (also called CC1). If you add a second hi-hat to your kit, its openness will be sent on the controller that is not selected here.
In addition, you can choose whether or not MIDI notes that correspond to hi-hat pedal down events should be sent. By default these notes are sent because it gives the best behavior across a wide range of drum samplers we have tested. However, some samplers support “splashing” the hi-hats by quickly pressing and depressing the hi-hat pedal and, for this to be enabled, pedal down events should not be sent.
MIDI map
By default, Aerodrums tries to stay as close as possible to the General MIDI specification in terms of the notes it sends. This gives good results with instruments and samplers that do the same, for example Toontrack’s EZDrummer and Superior Drummer. However, you may have to manually tell your software what code to expect for a given note.
Aerodrums also includes MIDI map presets for many popular drum samplers, you can see the list on this page.
You can also create new MIDI maps to configure Aerodrums to send the notes that your sampler expects.
If no preset is available for your sampler, and you prefer using your DAW or sampler’s MIDI map editing feature instead of Aerodrums, the table of default notes below will help you configure your software:
| Note | Note name | MIDI code |
| Kick | C1 | 36 |
| Kick 2 | B0 | 35 |
| Snare | D1 | 38 |
| Rimshot | E1 * | 40 * |
| Snare 2 | C0 | 24 |
| Rimshot 2 | C#0 * | 25 * |
| Cross stick | C#1 | 37 |
| Very high tom | D2 | 50 |
| High tom | C2 | 48 |
| Mid tom | B1 | 47 |
| Floor tom 1 | G1 | 43 |
| Floor tom 2 | F1 | 41 |
| Hi-hat (bow) | A#1 | 46 |
| Hi-hat (edge) | D0 * | 26 * |
| Hi-hat (pedal) | G#1 * | 44 * |
| Hi-hat 2 (bow) | D#0 * | 27 * |
| Hi-hat 2 (edge) | E0 * | 28 * |
| Hi-hat 2 (pedal) | F0 * | 29 * |
| Crash | C#2 | 49 |
| Crash 2 | A2 | 57 |
| Crash 3 | F#0 * | 30 * |
| Splash | G2 | 55 |
| Splash 2 | G0 * | 31 * |
| Ride | D#2 | 51 |
| Ride bell | F2 | 53 |
| Ride 2 | B2 | 59 |
| China | E2 | 52 |
| China 2 | G#0 * | 32 * |
| Cowbell | G#2 | 56 |
| Tambourine | F#2 | 54 |
* Non General MIDI name/code
MIDI drumming settings
Some of Aerodrums’ MIDI settings are better adjusted while you are drumming. There are three such settings:
- Unintended notes filtering: Aerodrums is very sensitive and sometimes detects hits that you do not intend. We have designed the sound rendering in Aerodrums so that such hits are as close to inaudible as possible. However, the quietest sounds played by most samplers are very audible and it is not always possible to correct for this by adjusting your sampler’s settings. For this reason, we let you filter out very soft hits that may be unintended. This feature is also useful to input a clean groove into a sequencer.
- Hi-hat bow vs. edge hits: Since Aerodrums does not detect the angle at which a stick strikes a drum or cymbal, we cannot detect when the drummer intended to hit the top of the hi-hat versus the edge. As a compromise, this setting allows you to specify a threshold hit strength beyond which hi-hat edge hits will be triggered instead of bow hits.
- Rimshot hits: Similarly, this setting lets you trigger rimshots for the snare when you hit harder than the value you specify.
These settings can be adjusted by hitting “Adjust drums” in the drumming menu, then hitting “MIDI”. These settings are drum kit specific and will be saved with your kit. (Please remember that you cannot adjust the preset kits, you need to clone them first to create your own copies.)
On the screen that appears, you can select the drum/cymbal whose settings you want to change by hitting it firmly twice.
For filtering, all elements have a slider to adjust the hit strength below which hits will not be sent as MIDI notes. The slider value is a percentage of the hit strength (speed) that corresponds to the maximum MIDI velocity. For example, a value of 2 means that hits for which the marker was moving at less than 2% of the speed required to reach the highest MIDI velocity will not trigger notes. (The Sensitivity setting determines the speed required to reach the highest MIDI velocity.)
Only snares show the slider to adjust the hit strength above which hits are considered rimshots. Similarly, only hi-hats show the slider to adjust the hit strength above which hits are considered edge hits. By default, both thresholds are set to 100% meaning that no rimshots or edge hi-hat hits will be triggered.
Troubleshooting
Windows camera driver
New: An interactive troubleshooter is now available, with specific information about the camera: click here to get help.
In some circumstances, the Camera driver may not configure properly during the installation of Aerodrums. In particular, there is currently a compatibility issue with some editions of Windows Vista. If this is the version of Windows that you have, please visit this page to download and install a legacy driver.
If you have a more recent version of Windows, here are the first steps you can take to remedy the problem:
- Unplug the camera and reboot your computer.
- Once you can see your Desktop again, plug the camera into a USB port.
- Wait about 10 seconds then launch Aerodrums.
If an error message about the camera driver or libusb0.dll appears, follow the next steps:
- Uninstall Aerodrums. (You can use the uninstall link that was created upon installation).
- Unplug the camera and reboot your computer.
- Run setup.exe again. Pay close attention if a warning about an existing driver is displayed. The warning contains instructions to remove drivers that are not compatible with Aerodrums.
- When prompted by the installer, plug the camera into a USB port.
- Finish the installation and launch Aerodrums.
If the problem is still not solved, please try our interactive troubleshooter. If this also fails to help, please send an email to the support address (@aerodrums.com).
Low framerate
In normal conditions, the indicator located in the top left of the drumming screen should be green and show a value of 125 frames per second (+/- 1). If the indicator is red, your drumming experience will degrade. You can troubleshoot this in this order:
- If the framerate value is stable, e.g. around 60 or 75 frames per seconds, check that your graphics card does not synchronize the swapping of the frame buffer with the monitor’s refresh rate. This setting is also known as “vsync”. It should be disabled. This can be done in the control panel provided by your graphics card manufacturer, by creating a profile for Aerodrums and setting vsync to off.
- If you have more than one graphics card (e.g. nVidia Optimus or AMD Dynamic Switchable Graphics), make sure that you run Aerodrums using your dedicated graphics card. This can be set in the control panel provided by your graphics card manufacturer, by creating a profile for Aerodrums.
- There may be programs running in the background that compete with Aerodrums for computing resources. Close them to enable Aerodrums to run at the required speed.
If the steps above do not solve the problem, it means that your computer’s graphics hardware struggles to render Aerodrums. We provide several faster graphics mode to enable you to drum in spite of this. You can cycle through less demanding graphics mode by pressing control + g (maintain the control key down and press g). This way, you can pick the mode you like best that gives a consistently green performance indicator.
Here is a description of the four alternative graphics modes:
- Only your sticks, feet and pedal gauges move, but they move as smoothly as in normal mode.
- Everything moves, but 3 times less visually smooth than in normal mode (but you can of course drum just as fast).
- Same as above except the graphics are simplified.
- Nothing is displayed, it is like drumming with a blindfold.
Pressing control + g again from the fourth mode will bring you back to normal mode.
Windows audio API
If you cannot select either of the WASAPI APIs in the “Latency” screen, you will need to change your Windows sound configuration. It is not possible for Aerodrums to do this automatically. Here are the steps to follow:
- Go to Control Panel – Sound – Playback tab
- Select the audio playback device that you are currently using then go to Properties – Advanced tab
- In the Default Format drop down menu, select a format with a 44100Hz rate. This is required for Exclusive/Shared WASAPI.
- In the Exclusive Mode section, tick both checkboxes. This is required for Exclusive WASAPI.
Windows 8 audio glitches
We recently realized that Windows 8 has some issues with the hardware of some computers, causing sub-optimal audio performance in Aerodrums.
Here are the symptoms: when you first start Aerodrums and use the default audio buffer size (128 samples) and recommended audio API (WASAPI), the sound is badly distorted.
There is a good chance that this is caused by Windows 8’s way of allocating resources to the Bluetooth, WiFi and audio hardware.
Here are the steps you can take to troubleshoot this:
- Close Aerodrums.
- Press the Windows key + C, or swipe in from the right edge of the screen to open your Charms.
- Select the Settings charm, and then click Change PC settings.
- Select Wireless.
- Change the Bluetooth setting to Off.
- Change the WiFi setting to Off.
- Start Aerodrums.
- In the Latency screen, selected WASAPI Exclusive and experiment with low values of the Audio buffer size slider.
If your computer has keys to physically power off the WiFi and Bluetooth hardware, we recommend doing this instead of using the Windows 8 interface.
If these steps do fix the audio glitches/high latency in Aerodrums, in most cases we have observed, re-enabling WiFi will not bring the glitches back.
We are researching the issue further so see if Bluetooth and WiFi can be used along with Aerodrums in all cases under Windows 8.
Aerodrums audio while in MIDI mode
Depending on the audio configuration of your computer and of your sampler/DAW, you may not hear sounds from Aerodrums while your sampler/DAW is running. This includes song playback, the metronome and the drumming menu navigation sound, which may be useful even in “MIDI Only” mode.
This is caused by your sampler/DAW placing your audio device in a low latency state where no other application can use it, including Aerodrums.
On Windows, the most common cause is the use of an exclusive ASIO driver for sound playback in your sampler/DAW. Unfortunately, all of the popular standalone drums samplers we have tried support ASIO, but not WASAPI. One or the other is required to get good latency when using a sampler to drum in real time with Aerodrums. The most popular ASIO driver – ASIO4All – is exclusive: it only lets one application use a given audio device. If you are in this case and miss the Aerodrums audio, one solution is to install/plug a second sound card in your computer. You will need to configure your sampler/DAW to use one sound card and Aerodrums to use the other.
If your ASIO driver is non-exclusive, or your sampler/DAW does support shared WASAPI audio output, you may still experience the problem if the sampling rate of the audio device and of your sampler/DAW is different from the one Aerodrums uses: 44100Hz. Please see the Audio device section for instructions on how to set your device to 44100Hz.
On Mac, if Aerodrums cannot play sound it is because the sampler/DAW has put the CoreAudio device in a state where it will not playback sounds that require sample rate conversion (this is sometimes done to maximize performance). The solution is to set the audio device and sampler/DAW to use a 441000Hz sampling rate.
- Open the Audio MIDI Setup application. (You can type MIDI in Spotlight to find it.)
- In the window that appears, in the left pane, select your audio output device.
- In the right pane, select 44100Hz in the Format drop-down list.
- Set the sampling rate to 44100Hz in your sampler/DAW.
Transporting Aerodrums
We recommend that you re-use the box that Aerodrums came in to store or transport it. This will ensure that the tips of the drum sticks do not touch other surfaces. They are made of a fragile material and contact with other objects should be minimized.


Continue with Facebook
Continue with Google
To get Aered