エアロドラムオンラインマニュアル
工事中
This is the online manual for the Aerodrums air drumming instrument.
In the event that you can’t find what you are looking for here, you can ask a question on the forums at aerodrums.com, or send an email to the support address.
You can open this manual in your browser from Aerodrums by clicking the “Help” button in the home screen, then by pressing the “Online manual” button.
Please note that this manual applies to the latest version of Aerodrums. Mac users can get the latest version here. Windows PC users can check that they are running the latest version by clicking the “Check for Aerodrums updates” link that is located in the Aerodrums group in the Start Menu, or by running the updater.exe program that can be found in the directory where Aerodrums was installed (typically C:\Program Files (x86)\Aerodrums). Please make sure that Aerodrums is not running when checking for updates.
Getting started
This section of the manual covers the few steps required to start drumming with Aerodrums for the first time. If you have followed the instructions from the manual that came in the box, you can skip to the first run section.
Let us go through the different parts that came in the box so that we can introduce some vocabulary:
- Two drum sticks with reflective balls
- Two foam triangles with elastic loops: the “foot markers”
- A donut shaped lamp with a lens and a USB plug: the “lamp”
- A pair of paper sunglasses
- A safety warning leaflet
- A manual that contains your Aerodrums product key
You will also need:
- A Sony® Playstation® Eye camera (for Playstation 3): the “camera”
- A computer (minimum spec. Intel® Core 2 Duo 2GHz ideally with a dedicated graphics card) running one of the following operating systems: Windows Vista, Windows 7, Windows 8 or Mac OS X 10.6 and up; with 2 gigabytes of free hard disk space and two free USB ports which must support the USB 2.0 protocol
- A one time high speed internet connection to download the Aerodrums software
- A desk or dining table, or any surface of similar height
- A seat
Installing the software
Download the Aerodrums installer from this address: aerodrums.com/installer/.
You will need to enter your product key to access the installer and any software updates so keep it safe.
On Windows PC
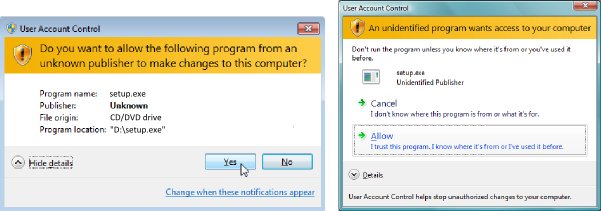
Make sure you are logged in with a user account that has Administrator privileges and that you have not plugged the camera in yet. Download the installer zip file, extract it, then run the setup application.
Windows will ask you if you want to allow the setup application to make modifications to your computer, please click ‘Yes’ or ‘Allow’ (see images below). This is required because setup also installs a driver used by Aerodrums to communicate with the camera. If you encounter problems installing the camera driver, please refer to the troubleshooting section of the manual.
The setup application will then install the Aerodrums program. Please follow the instructions given. You will need to enter your product key again during installation.
On Mac
Open the downloaded disk image (.dmg) file and follow the displayed instructions. You will need to enter your product key the first time Aerodrums is run.
Setting up the hardware
Preparing the lamp and the camera
The lamp is designed to be attached to the housing of the camera lens. To do this, insert the housing of the camera lens into the hole at the back of the lamp until you encounter some resistance. Then gently push against this resistance to secure the lamp to the camera. See the drawing below for an illustra-tion of the end result:
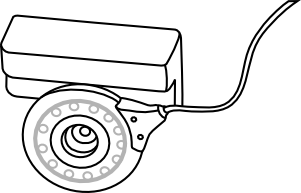
During this process, you may notice that the housing of the camera lens can rotate. Once you have attached the lamp to the camera, please ensure that the lamp/lens is fully rotated clockwise when facing towards you (blue dot setting).
You can now plug the lamp into a USB port. Please do not plug the camera in yet. Instead, please wait for the installer to prompt you to do so.
Picking a drumming location
The two requirements for a suitable location to use Aerodrums are that:
- There is enough free space in front of the table (or any surface of similar height, for example a low shelf).
- You have the ability to control the amount of light near your seat.
Aerodrums works by watching you drum through the camera. It understands the location of your drum sticks and feet because they appear brighter than other objects, thanks to the lamp and markers.
For this reason, it is important that the camera cannot see objects that are brighter than the markers. The picture below shows examples of unsuitable objects near your seat.

Here is a video illustrating how to prepare a suitable location for drumming with Aerodrums:
Please note that Aerodrums is not designed to work outdoors in broad daylight.
Placing your camera and seat
The video below illustrates how to place your drumming seat so that the camera has a good view of you. You can also read on and look at the drawings that follow.
If you are left handed, please imagine that drawings 1 and 2 are mirrored, and substitute “right” for “left” in the explanations that follow.

1. Place the camera on the very edge of a standard height desk or dinner table (roughly 72cm or 29 inches), so that the lamp overhangs the table.
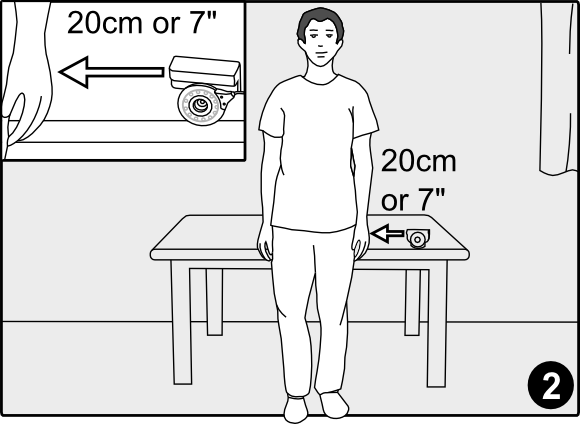
2. Stand against the edge of the table, facing away from it, with your arms at your sides so that the camera is roughly 20cm (7 inches) to the left of your left hand.
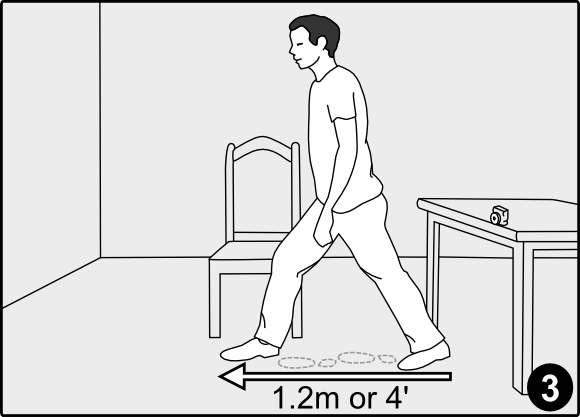
3. Take one big step forward, roughly 1.2m (4 feet) from heel to foot tip. You can also take three small steps, placing your feet at the end of each other.
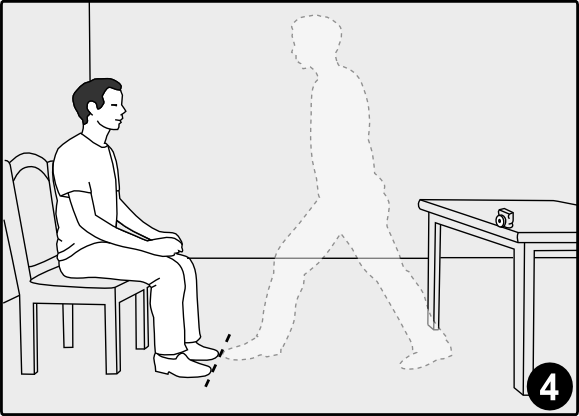
4. Place your seat directly in front of you, facing the table, so that when you are sitting, the tips of your feet are where the tip of your front foot was after the big step.
At this point, please turn the lamp on using the small black switch located where the cable meets the lamp. As regards the lamp, please refer to the safety warning leaflet: we advise that you wear sunglasses when drumming with Aerodrums.
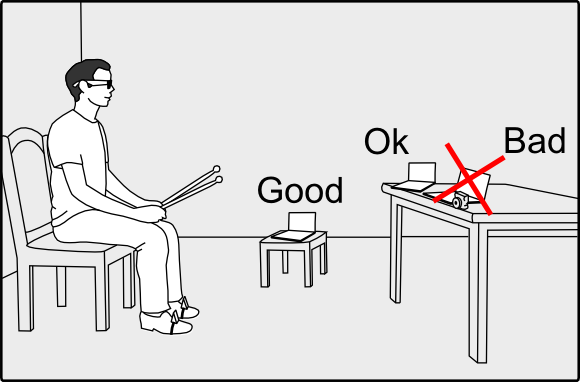
Please place your computer screen away from the camera. If you don’t, the lamp will dazzle you when you look at the screen because it will be in your direct line of sight.
The picture below illustrates good and bad locations for your computer screen:
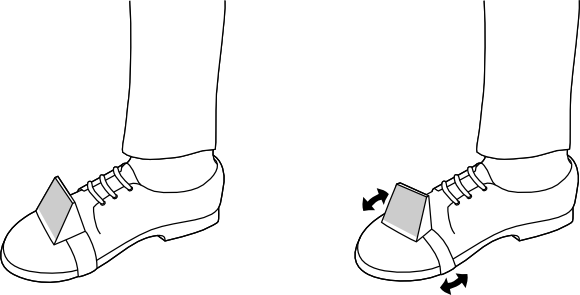
How to wear the foot markers
Aerodrums is designed to let you operate drum pedals by tapping the ball of your foot (using either heel-up or heel-down technique).
To wear a foot marker, orient it so that the base of the foam wedge is facing down, and the reflective patch faces away from you and towards the camera. Insert your foot into the elastic loop. We recommend that you place the marker as far to the front of your foot as possible, while making sure it is secure enough to not slip off (see drawing below).
If your feet make a wide angle when you play, pivoting the foot markers so that they face towards the camera will help Aerodrums track your feet better.
First run
Latency settings
When you run Aerodrums for the first time, you will see three introduction screens then be asked to pick some settings that pertain to audio latency.
Latency is the time that elapses between the instant when you intend to hit a drum and the instant when the resulting sound can be heard. Your input is required because each computer’s audio hardware is different.
The Configuring latency section of this manual explains the latency settings in detail. After the first run, they can be reached from the home screen by clicking the “Latency” button.
Once you click “Finish” on the latency screen, you will see Aerodrums’ home screen:
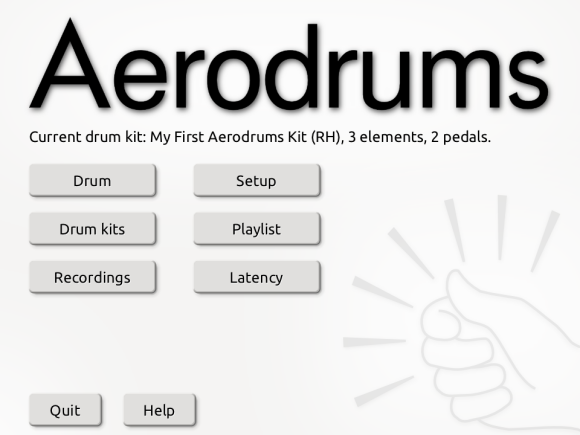
When you click the “Setup” or “Drum” button for the first time, Aerodrums will guide you through the few remaining steps to get drumming. It will ask you if you are left or right handed in order to select the appropriate layout for your first drum kit.
Checking the location and adjusting the camera
You will first see two screens reminding you how to pick a drumming location and how to place your seat with respect to your camera (see above).
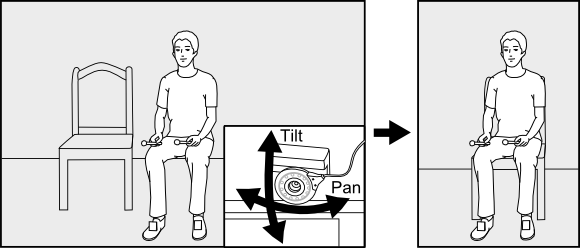
Aerodrums will then display what the camera sees, with a drawing of a seated drummer overlayed over the picture. The purpose of this step is to let you aim the camera to achieve a good framing of your seat.
It works by asking you to pan and tilt the camera until the drummer appears seated on your seat. The drawings below illustrate the process. It is important that the drum sticks, the foot markers, and you stay out of sight of the camera during this step.
If you notice that your seat is too big or too small for the drummer, please check that you have placed your seat as shown above.
During this process, Aerodrums may display a warning message about brightness and a “Check lighting” button. We recommend that you press it before fine tuning the orientation of the camera.
If there is a problem, areas that are too bright will appear in red. Closing some curtains or blinds and dimming some lights should solve this (click the “Check lighting” button again if it is still there).
If you cannot eliminate the red areas from the picture, you will have to pick a location where you have more control over the light reaching the camera (see above).
The first few times you go through this process, you may find it useful to go to your seat and observe how well your image matches the drawing of the drummer. Of course you may not be the same shape or size as this generic drummer, but if you are able to place your feet where his are, and your image doesn’t feel too big or small compared to him, then your framing is good. Again, if you appear much smaller or bigger than the drawn drummer, you should probably check that you have placed your seat at the right distance from the camera.
Once you have seated the drawn drummer on your seat and clicked “Next”, Aerodrums will check for bright objects. If some are present, they will appear in red. There are three things you can do to address bright objects:
- Remove them from the camera’s field of view.
- Dim the lights or draw blinds or curtains.
- Cover them.
If there are bright objects, you can click “Back” to get a better view of where they are located. Please note that the red areas will not update on this screen. This means that you will need to click “Next” again to check that you have succeeded in removing the bright objects.
Once there are no bright objects, Aerodrums will invite you to take your seat. Make sure that your computer screen is oriented so you can see it from your seat, and don’t forget your drum sticks; and foot markers if you wish to use pedals.
You may notice that there is a “Skip” button on the screen that warns you about bright objects. Please only use this button if you are certain that the objects detected (red areas) correspond to your sticks or your foot markers. This can happen if you have left them in view of the camera during this step (e.g. you left the sticks on your seat).
You are now ready to drum. Your first drum kit is a basic kit with snare, hi-hat and bass drum.
When you want to select a different kit, go back to the home screen by clicking the home icon, then click the “Drum kits” button. You can then choose a different kit from the list of preset kits in the screen that appears. This screen also lets you create your own drum kits. This feature is documented in the making new drum kits section of this manual. When you are done, click “Ok” to return to the home screen.
Last checks
Aerodrums now displays your drum kit and the location of your drum sticks and foot markers (if you are wearing them). Make air drumming gestures at the location of drums or cymbals to hit them. You can find a tutorial video of the stick technique that works best with Aerodrums here.
Here is a screenshot of what you see while drumming:
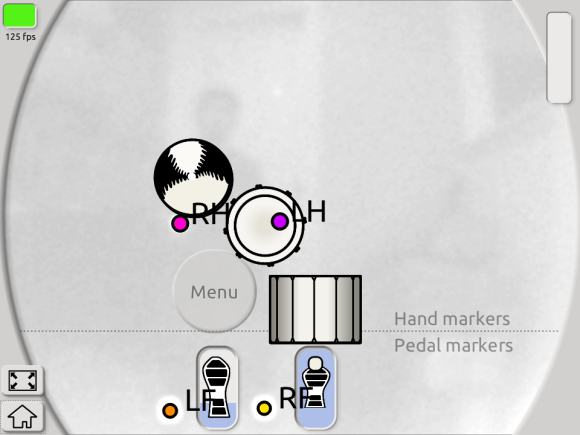
The colored circles represent your sticks (RH, LH) and feet (RF, LF). Notice the dotted line, your sticks should appear above it and your feet below it. If your feet cross this line while operating pedals, we recommend that you adjust your camera and seat again.
In the bottom left of the drumming screen, there are two buttons that you can click with your mouse. The top one toggles full screen display. The bottom one brings you to the home screen.
The kit presets that we provide all contain a snare drum placed at the usual snare location: directly in front of the drummer, slightly above their knees. The height of your seat, your height and your posture can cause the snare (and the whole drum kit with it) to be offset with respect to where you expect it to be.
Usually, nudging your seat by a small amount is enough to place yourself so you can reach the snare comfortably. However, this will not work if you are much taller or smaller than the generic drummer we created the preset drum kits for. (If you are not particularly tall or small, please double check that you have followed the placement and framing instructions above.)
In this case, you will need to place the drums so that they can be reached comfortably, just like you will when you create your own custom kits later on. The drum kit adjustment section explains how to place single drums or all the drums at once.
Drumming menu
When you are drumming, you can perform useful tasks without reaching for your computer. This is done via a menu that you can navigate by making the same air drumming gestures you use to hit your drums.
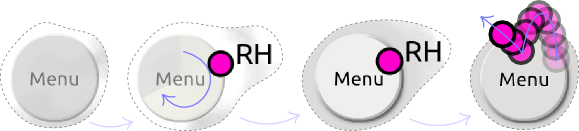
Here is how to enter the drumming menu: Slightly below your snare drum and to the left (right if you are left handed), you will see a faint circular button labeled “Menu”. When you bring one of your sticks over this button, a clockwise swipe animation of the button starts. If you keep your stick over the button long enough (roughly half a second), the animation completes and the button becomes activated: it now appears solid. You can now hit the button by making a firm drumming gesture on it, just like you would to play an accent on the snare for example. The button will remain activated for a while even if your stick leaves it. This lets you make your drumming gesture without worrying about the button de-activating in the process. See the picture below for an illustration:
Some screens of the drumming menu contain sliders. To set a value using a slider, hover over it with one of your sticks to activate it, move your stick horizontally to adjust the value, then move your stick vertically to exit the slider and set it to that value. Here is what an active slider looks like:

The paragraphs below describe the various sections of the drumming menu. Generally, you will encounter two types of screens:
- Screens where you can drum at the same time as adjusting a setting. In those screens, your drum kit is displayed and the menu buttons and sliders appear faint below the hand drums. Before you use the buttons and sliders,
you have to activate them in the same way you did to enter the drumming menu. Leaving your stick long enough on any button or slider will activate all the buttons and sliders. - Screens where you can only interact with the menu items. In those screens, buttons and sliders do not require activation: you can hit or adjust them immediately.
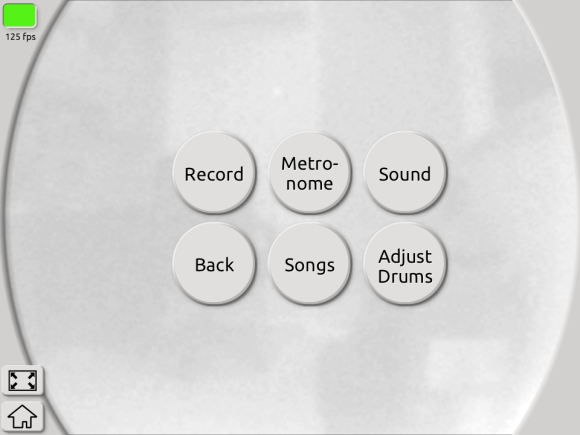
Here is a screenshot of the drumming menu:
On the “Adjust drums” and “Sound” screens of the drumming menu, you will notice a “Save changes” button. It gets highlighted in yellow once you have made changes in any sub-screens. If you want your changes to persist the next time you run Aerodrums, please make sure you hit that button.
Playing songs
Aerodrums keeps track of the last song that you played, if any. To play a song, it must first be in your playlist. You can add mp3 or ogg files to your playlist by clicking the “Playlist” button in the home screen, see picking songs.
To pick a song and start/stop playing it, hit the “Songs” button in the drumming menu.
You can then cycle through the songs in your playlist with the “Previous Song” and “Next Song” buttons. Use the “Play/Stop” button to toggle playback.
If you want to practice a specific part of a song, you can use the “Start time” slider. Each time you hit “Play”, Aerodrums will play the song from that time.
Sometimes you will want to get ready to drum before the song starts playing. Hit the “Play with delay” button to do this. It will bring you back to the drumming screen and there will be a 5 second countdown until the song starts playing.
Metronome
Hit the “Metronome” button in the drumming menu to enter the metronome screen. From here you can start or stop the metronome and set the tempo using the “Tempo” slider.
Volumes, panning and reverb
You can adjust how drums, songs and the metronome are mixed, as well as the master volume and drums panning/reverb, by hitting the “Sound” button.
To change volume levels, hit the “Volume mixing” button to enter the volumes screen. By hitting the volume button to the right of the “Done” button you can cycle between master, drums, song and metronome volumes. The slider to the right of that will adjust the currently selected volume level. As you make modifications you can keep drumming to save you from having to exit this screen.
To change the amount of reverb applied to the drums, hit the “Reverb” button to access a reverb slider.
By hitting the panning button you can alternate between “Center panning” and “Auto panning” modes. Center panning means that the drum samples will be played without any additional panning applied (the samples that are included with Aerodrums are generally panned down the center). Automatic panning means the drums will be panned based on their position relative to where the drummer is seated, e.g. for a standard right-handed kit, the snare drum would be panned down the center, the hi-hat would be panned slightly to the left, the ride cymbal would be panned to the right, etc.
Recording
Aerodrums lets you record your drumming for later use, such as exporting it as a wav file (see Exporting your music).
Hit the “Record” button in the drumming menu to start recording. While recording, the edges of the screen will flash red. Hit the “Stop” button to finish recording.
Each recorded performance will appear in the Recordings menu, reachable from the home screen by clicking the “Recordings” button.
Adjusting drums
While drumming, you can make changes to your drum kit, such as moving a drum or adjusting how it responds to hits. To do so, hit the “Adjust drums” button in the drumming menu.
Please note that you can only do this if the drum kit you are currently playing is not one of the preset kits. If you are using a preset kit, the “Adjust drums” button will be grayed out. To be able to adjust the drum kit, you will need to go back to the home screen, click the “Drum kits” button, create a copy of the current preset by clicking the “Clone” button, then click “Ok” to leave it identical. When you resume drumming with this new drum kit, the “Adjust drums” button will be available.
The next section documents all the adjustments you can make.
Drum kit adjustment
Placing one drum
Use this mode when you are satisfied with the overall configuration of your drum kit, but you want to move one drum or cymbal.
Aerodrums will first ask you to hit the drum or pedal you want to move, then to make an air drumming gesture at its new location. The current drum/pedal being moved is indicated with a yellow halo.
Please note that if you move a drum or cymbal to a very different location, you may have to adjust that drum/cymbal’s response. For example, if a crash cymbal was near you, high and to your left, and you move it far in front of you and to your right, it will now sound much louder when you hit it. (This is because the motion of your drum stick marker now appears much faster to the camera, because it is closer.)
Placing all drums
In this mode, Aerodrums will ask you to place each drum one after the other. Drums that have not been newly placed yet will be drawn faintly at their original location. A yellow halo indicates the current drum or pedal being placed. You can skip drums whose position you want to leave unchanged (activate and hit the “Skip this drum” button). There are two cases where it is expedient to place all the drums at once:
- Aerodrums sometimes misunderstands which drum you intend to hit and you want to fix this.
- You want to experiment with a completely different arrangement of your drums and cymbals.
The first case can happen when you involuntarily place your seat closer to or further from the camera than is expected by the drum kit’s current configuration. It may particularly affect drums that are near each other on the screen, but behind each other in reality, like for example a high tom and a snare. To remedy this, when Aerodrums asks you to place a drum, take care to hit it at the depth (distance from the camera) you intend for it. For example, closer for the snare and further for the high tom. You do not have to change the screen location of any drums, Aerodrums is able to distinguish between near and far drums once reminded of their correct depth. Again, it may need reminding only if your seat or camera placement has changed. For this case, we recommend not skipping any drums. Because Aerodrums can distinguish between near and far drums, it is not a problem if drum icons overlap significantly on the screen.
In the second case, you will probably want to adjust the response of the drums you have moved far from their original location.
Drum response
When you hit a drum, Aerodrums picks an audio sample and a playback volume as a function of how hard you hit the drum. This is what we call drum response. We model it with three parameters:
- Sensitivity: how hard you need to hit the drum in order to hear the loudest sample.
- Volume: how loud that drum will sound compared to the other drums.
- Response curve: the shape of the curve that maps your drum stick or foot speed to the loudness of the sample played.
In this mode, you can adjust the volume and sensitivity of individual drums and pedals at the same time as you drum.
To set the current drum or pedal being adjusted, hit it firmly twice in a row. A yellow halo indicates the current drum or pedal. Hi-hats have a different response for stick and pedal hits; take care to hit the hi-hat twice with a stick to adjust stick response, or with your foot to adjust pedal response.
Aerodrums displays a gauge and graph on the side of the screen. Each time you hit that drum, the speed you hit it with will be displayed on that gauge. This lets you visualize where that hit fell within the sensitivity interval. For example, if it was near the maximum but you feel that you didn’t hit very hard, you may want to decrease the drum’s sensitivity. Use the “Sensitivity” slider for this.
Use the “Volume” slider to adjust how loud the current drum sounds compared to the other drums.
To cycle between the choice of response curves for the current drum, hit the button to the right of the “Done” button. The displayed response curve graph will update as you do this.
Hi-hat and cymbals
This menu gives you access to three screens that let you adjust the range, splash sensitivity and drop clutch setting of your hi-hat(s), as well as the experimental cymbal choking interface
Hi-hat range and splash. On this screen, you can adjust how much your foot must travel to open a hi-hat fully. You can also adjust how sensitive Aerodrums is to the foot motion that indicates hi-hat splashing. This foot motion consists in sharply bringing your foot back up before it reaches the floor, as if you were throwing the pedal board downwards to make it bounce. If your kit contains several hi-hat cymbals, you can select the one whose range and splash sensitivity you want to adjust by hitting it twice to highlight it.
Hi-hat drop clutch. This screen lets you adjust how open a hi-hat is when the foot that actions it is on a different pedal. If your kit contains several hi-hat cymbals, you can select the one whose drop clutch you want to adjust by hitting it twice to highlight it.
Cymbal choking (experimental). Aerodrums lets you choke all your kit’s cymbals (except the hi-hats) by bringing the tip of your sticks inside either of two zones. By default, these zones are located outside of your reach. On this screen, you can use the sliders to bring either zone closer to your kit, so that you can adjust them for comfortable reach if you wish to use this feature.
Picking songs
Click the “Playlist” button in the home screen to edit your playlist.
In the screen that appears, click the “Add” button to browse your computer for an ogg or mp3 file to add to your playlist.
To delete a song from the list, select it then click the “Remove” button.
You can order the songs by seclecting them and clicking the “Move up” or “Move down” buttons.
Use the “Play” button to listen to the selected song.
Exporting your music
Once you have recorded a performance (see recording in the drumming menu), you can listen to it and export it as a wav file. Click the “Recordings” button in the home screen to access these features.
Managing recordings
Aerodrums saves all the recordings that you make in a folder of its own, using a time stamp to name each file.
You can see a list of all recordings that are currently in Aerodrums’ directory. When you select a recording, you can listen to it, rename it or delete it by clicking the corresponding button.
After a while, there could be many recordings (ael files) in the “Recordings” folder located in your Aerodrums installation folder. We recommend that you regularly remove superfluous recordings and to make copies of recordings you wish to keep for later.
Exporting to WAV
You can export the selected recording to a wav file by clicking the “Export wav…” button. If you check the “Incl. song” tick box, the .wav file will include the song that was playing when you recorded, if any. You can also set drum panning to center and disable reverb.
Configuring latency
Click the “Latency” button in the home screen to change the latency settings.
Drum hit sensitivity
These radio buttons determine how sensitive Aerodrums is to subtle air drumming gestures (strictly speaking, they don’t pertain to latency). If you are hearing drum hits when you don’t intend them, change this setting from “Expert” to “Proficient”, or from “Proficient” to “Beginner”.
Audio buffer size
Note to Windows 8 users: Windows 8 has some hardware interaction issues between Bluetooth, WiFi and audio, please see the troubleshooting section for more information.
This setting determines how many audio frames must elapse after a drum hit is detected until the produced sound can start being rendered. How low you can set this value depends on the performance of your computer and on the quality of your sound card and driver. If you set this value below what your audio hardware can handle, you will hear audio glitches while drumming. We invite you to test decreasing values of this setting until you reach the minimum value yielding glitch free audio.
To test your current audio buffer size pick, click the “Apply” button, then the “Test” button. This test is only a guide, you may need to further adjust the audio buffer size if audio glitches occur while drumming.
Audio API
On Windows, Aerodrums supports three modes to drive the audio hardware of your computer:
- “Exclusive WASAPI” gives the lowest audio latency, but prevents other programs from playing any sounds while Aerodrums is running. This is the setting we recommend.
- “Shared WASAPI” gives intermediate audio latency, with the advantage that other programs can play sounds while Aerodrums is running.
- “Windows default” should only be selected if the other settings are greyed out. See the troubleshooting section to understand why that may be the case and how to remedy it.
On Mac, two modes are provided:
- A lower latency option that avoids sampling rate conversion but may restrict other applications from outputting audio. This option will give the best results.
- A higher latency option that will “play nicely” with other applications.
Your choice of a new audio API takes effect when you click the “Apply” button. We recommend that you re-adjust the audio buffer size after changing API (see above).
Manual audio device selection
If your computer is equipped with several audio devices that you use simultaneously in different programs, you can manually select which one you wish Aerodrums to use. To do so, click the “change” button located to the right of the line naming the current audio device.
Making new drum kits
Besides offering some ready made drum kits, Aerodrums lets you compose your own kits, including the customization of drums with your own samples.
Kit composition
In the “Drum kits” screen, there is a “New” button under the drum kit list that lets you create new kits.
In the screen that appears when you click “New”, you can:
- Name the new drum kit (entering a name is necessary to save the new kit, and the name has to be unique).
- Select whether it is a right or left handed kit.
- Add drums or cymbals from the list of available elements: select the element you want to add then click the right arrow button (you can also double click on the element).
- Remove drums or cymbals from the list of chosen elements: select the element you want to remove then click the left arrow button (you can also double click on the element).
A drum kit can contain several identical drums or cymbals.
To save the new drum kit and return to the kit choosing screen, press the “Ok” button.
Instead of composing a new drum kit from scratch, you can use an existing kit as a base: select an existing kit then press the “Clone” button.
You can also edit an existing drum kit: select it then click the “Edit” button. You cannot however edit the presets that came with Aerodrums (including adjusting the drums from the drumming menu).
You can “Clone” the preset first and make your modifications on that copy.
To delete a drum kit, select it then click the “Delete” button. You will be prompted to confirm.
When you create new drum kits, the location of new drums or cymbals will be unknown. When you click “Drum” or “Setup” for the first time with a new kit, Aerodrums will ask you to place each new drum one after the other before you can start drumming. This process is similar to the “Place all drums” feature of the drum kit adjustment menu: you place each drum by making an air drumming gesture at the location where you want it.
Making new drums
When you are in the drum kit editing screen (reached with the “New”, “Clone” or “Edit” buttons in the “Drum kits” screen), you can add new drums or cymbals by clicking the “New” button at the bottom of the “Available elements” list.
In the “New element” screen that appears you can:
- Name the new element (entering a name is necessary to save the new element, and the name has to be unique).
- Browse your computer for a directory containing the sound samples that will be played when that drum or cymbal is hit.
- Use the radio buttons to select what type of drum kit element you are making.
When you press the “Ok” button, Aerodrums will analyze the samples in the directory you provided and package them into an element (.ele) file. The samples will be sorted by increasing loudness (assumed to reflect hit strength), normalized and packed for efficiency. Depending on the number of samples you provide, this process may take some time. A progress bar will be displayed and you will be able to cancel the operation.
Aerodrums expects the samples to be organized in a specific way in the directory that you provide. The expected directory structure depends on the type of the element you are making:
- For all element types except Kick, Hi-hat, Hi-hat Splash, Custom (pedal) and Custom (pedal & sticks), you can place the samples directly in the directory. You can also place the dominant hand samples in a sub-directory named “r”, and the non-dominant hand samples in a “l” directory. Aerodrums supports distinguishing between dominant and non-dominant hand hits.
- For the Hi-hat and Custom (pedal & sticks) elements, Aerodrums expects a directory of samples for each level of openness of the hi-hat. The directory names have to be consecutive letters of the alphabet, with “a” containg the samples for when the hi-hat is fully closed and “b”, “c”, etc containing gradually more open levels. Each of these directories may contain the samples directly, or two sub-directories named “r” and “l” respectively containing samples for the dominant hand and the non-dominant hand. Aerodrums will also attempt to read from a directory named “ped” containing the samples corresponding to pedal hits. (Alternatively, sub-directories of “ped” named “a” and “b” can be used to specify two sets of samples which Aerodrums will alternate between for variation.)
- For the Kick, Hi-hat Splash and Custom (pedal) elements, you can place the samples directly in the directory. Alternatively, if you have two sets of samples corresponding to the same pedal, you can place these in sub-directories named “a” and “b” and Aerodrums will alternate between them.
MIDI
エアロドラムはMIDI信号を出力できます。この信号がMIDIに対応するサンプラーの起動を誘発したり、シークエンサーまたはデジタル・オーディオ・ワークステーション(DAW)にドラムの演奏を録音したりできます。そのためにはソフトウエアMIDIポートが必要で、そのポートにエアロドラムとサンプラー/DAWを仮想的に接続させます。ソフトウエアMIDIポートは、仮想MIDIケーブルと考えて良いでしょう: ケーブル線がMIDIのハードウエアに接続する一方、ポートはMIDI対応のプログラムに接続します。Mac OS X とWindowsではソフトウエアMIDIポートの作成方法が異なります。
Mac OS XにソフトウエアMIDIポートを作成します。
- オーディオMIDI設定アプリケーションを開いてください。(Spotlight に「MIDI」を入力して検索できます。)
- メニューにあるウィンドウをクリックし、「MIDIウィンドウを表示」を選んでください。
- 現れてきたウィンドウにあるIAC Bus のアイコン(薄赤色)をダブルクリックしてください。
- 開いたウィンドウで「装置がオンライン」にチェックを付けてください。
WindowsにソフトウエアMIDIポートを作成する
残念ながら、Windows にはソフトウエアMIDIポートを作成するために内臓された機能はありません。しかし、仮想MIDIケーブル・プログラムでなかなか良いものがいくつかあり、非商業目的で使用する場合には無料のものもあります。弊社がお勧めするのは LoopBe1です。 これにはコンフィグレーションの必要がありません: インストールして実行するだけです(お持ちのWindowsのバージョンによっては、LoopBe1をインターネットからダウンロードした際、署名がないことに対して承認が求められる警告が出る場合があります)。
エアロドラムをソフトウエアMIDIポートに仮想接続する
これでポートが作成できましたので、エアロドラムを実行させ、MIDI画面を開くことができます(ホーム画面のMIDIのボタンをクリックします)。
MIDIを起動するために「MIDIのみ」または「MIDIと音」のいずれかを選択します。前者はエアロドラムのドラムの音を消します(そして、メモリーからサンプルすべてをアンロードします)。後者は、エアロドラムのドラム音を鳴らし続ける一方で、対応するMIDIノートを送ります。これは、たとえば、デフォルトのエアロドラムのサンプルを聞きながら、MIDI演奏をDAWに録音したい場合などに便利です。
次には、ノートを送るための正しいMIDIソフトウエア・ポートを選択します。上記の指示に従ってポートが作成できている場合は、Macではポートを「CoreMIDI, IAC Bus #1」と呼び、Windowsでは「MMSystem, LoopBe Internal MIDI」と呼びます。
これでMIDI対応のプログラムを起動でき、それをエアロドラムと同じポートに仮想接続し、エアロドラムで演奏するノートをそのプログラムが受けられるようにします。
以上の設定についてWindowsとMacでの手順を説明しているビデオをこちらでご覧ください (英語)。
ハイハットの設定
ハイハットのオープン度の情報を送るためにどのMIDI連続コントローラー(CCとも言う)をエアロドラムが使うかを調整できます。プログラムの中にはこれを「フットペダル」CC(CC4とも呼ぶ)を介してその情報を得ることを予想し、また「モジュレーション・ホイール」CC(CC1とも呼ぶ)を介して情報を得ることを予想するプログラムもあります。 お持ちのドラムセットに二台目のハイハットを追加する場合、オープン度の情報は、ここでは選択されていないコントローラーによって送られます。
さらに、ハイハット・ペダルを踏んだイベントに反応するMIDIノートを送信すべきかどうかを選択できます。デフォルトでこのノートは送信されますが、それは弊社で広い範囲のドラムサンプラーをテストした経験から、そうすることによってベストの演奏結果が得られることがわかったためです。しかし、サンプラーの中には、ハイハットのペダルを素早く踏んで離すことによってハイハットの「スプラッシュ」をサポートするものがあります。これを使うと、ペダルを踏んだイベントは送信すべきではありません。
MIDI マップ
送信するノートに関しては、エアロドラムはジェネラルMIDI規格にできるだけ従うようにしていますが、そうすることによって、同じように規格に従う機器やサンプラーとの関わりで良い結果が出ます、たとえば、Toontrackの EZDrummerやSuperior Drummerです。しかし、あるノートに対してどのようなコードを予想するのかを、お持ちのソフトウエアに手動で教えてやることが必要となることもあります。
たくさんの人気のあるドラムサンプラーのMIDIマップのプリセットをこのページからダウンロードできます。お持ちのサンプラー用のプリセットがなければ、以下の表を参考にして、必要であれば、ソフトウエアを構築してください:
| 音 | 音名 | MIDIコード |
| Kick | C1 | 36 |
| Kick 2 | B0 | 35 |
| Snare | D1 | 38 |
| Rimshot | E1 * | 40 * |
| Snare 2 | C0 | 24 |
| Rimshot 2 | C#0 * | 25 * |
| Cross stick | C#1 | 37 |
| Very high tom | D2 | 50 |
| High tom | C2 | 48 |
| Mid tom | B1 | 47 |
| Floor tom 1 | G1 | 43 |
| Floor tom 2 | F1 | 41 |
| Hi-hat (ボウ) | A#1 | 46 |
| Hi-hat (エッジ) | D0 * | 26 * |
| Hi-hat (ペダル) | G#1 * | 44 * |
| Hi-hat 2 (ボウ) | D#0 * | 27 * |
| Hi-hat 2 (エッジ) | E0 * | 28 * |
| Hi-hat 2 (ペダル) | F0 * | 29 * |
| Crash | C#2 | 49 |
| Crash 2 | A2 | 57 |
| Crash 3 | F#0 * | 30 * |
| Splash | G2 | 55 |
| Splash 2 | G0 * | 31 * |
| Ride | D#2 | 51 |
| Ride bell | F2 | 53 |
| Ride 2 | B2 | 59 |
| China | E2 | 52 |
| China 2 | G#0 * | 32 * |
| Cowbell | G#2 | 56 |
| Tambourine | F#2 | 54 |
* ノン・ジェネラルMIDIの名前/コード
MIDIドラム演奏設定
エアロドラムのMIDI設定の中にはドラム演奏中に調整する方が良いものがあります。そのような設定が三つあります:
- 予定しないノートのフィルター処理: エアロドラムは非常に敏感で、予定しない打音を認識することがあります。弊社は、エアロドラムで演奏を鳴らす時はそのような打音ができるだけ聞こえないようにデザインしています。しかし、ほとんどのサンプラーが最も静かな演奏音として出す音でもよく聞こえ、それを、お持ちのサンプラーの設定によって改善することは必ずしも可能ではありません。そのために、弊社では予定しない非常に小さな打音をフィルターするようにしています。この機能はクリーンなグルーブをシークエンサーに入力する時にも便利です。
- ハイハット・ボウ対エッジ・ヒット: ドラムスティックがドラムまたはシンバルを打つときの角度をエアロドラムは認識しないため、ドラマーがハイハットのてっぺんを打ってもエッジを打ってもそれを認識できません。妥協策として、この設定では、打つ強度の敷居値を特定して、その敷居値を超えると、ボウヒットの代わりにハイハット・エッジヒットが誘発されるようにしています。
- リムショット・ヒット: 同じように、この設定では特定した値よりも強く打った時にスネアのリムショットを誘発します。
これらの設定はドラム演奏画面の「ドラムの調整」を打ち、それから「MIDI」を打つことによって調整できます。これらの設定はドラムセット固有のもので、あなたのお持ちのセット用に保存できます。(プリセットのドラムセットは調整できないことをお忘れなく。まずそれをクローンして、あなた用のコピーを作成してください。)
現れている画面上で、設定変更をしたいドラムまたはシンバルを選び、それをしっかりと二度打ちます。
フィルターをかけるために、すべての楽器にはスライダーが付いており、打った強度がある数値以下になると打ったデータはMIDIノートとして送られないようにヒット強度を調整します。スライダーの値はMIDIの最大限のベロシティに対するヒット強度(スピード)の割合です。たとえばスライダーの値が2だとすると、マーカーがMIDIの最大ベロシティに到達するのに必要なスピードの2%以下で動いていたということで、ノートを誘発しません。(感度設定が、MIDIの最高ベロシティに到達するのに必要なスピードを決定します。)
スネアのみが、ある強度以上になるとリムショットと判断されるヒットの強度を調整するスライダーを表示し、同じように、ハイハットのみがある強度以上になればエッジヒットと判断するヒットの強度を調節するスライダーを表示します。デフォルトでどちらの敷居値も100%に設定されていますが、それはつまり、リムショットもエッジハイハットのヒットも誘発されないということです。
トラブルシューティング
Windows カメラ・ドライバー
エアロドラムのインストールの際にカメラ・ドライバーがうまく構成されないことがあります。これを解決するにはまず以下の手順に従ってください:
- カメラを接続からはずし、コンピューターを再起動してください。
- デスクトップが再び画面に現れると、カメラをUSBポートに接続してください。
- およそ10秒ほど待ってから、エアロドラムを立ち上げてください。
- エアロドラムをアンインストールしてください(インストールした際に作成したアンインストール・リンクが使えます)。
- カメラの接続を外し、コンピューターを再起動してください。
- 設定exe を再び実行します。現在のドライバーに関しての警告が画面に表示されないか、注意して見てください。警告にはエアロドラムと互換性のないドライバーを取り除く指示が含まれます。
- インストーラーに促されると、USBポートにカメラを接続してください。
- インストールを終了し、エアロドラムを立ち上げます。
問題がまだ解決しないようであれば、次の手順に従ってください:
問題がまだ解決しないようであれば、弊社の![]() にお問い合わせください。
にお問い合わせください。
低いフレーム・レート
ドラム演奏画面の左上にあるインジケーターは通常はグリーンで、毎秒125フレーム (+/-1) と表示されるはずですが、もしインジケーターが赤の場合はドラムのパフォーマンスが低下します。この問題を解決するために以下の指示に順番に従ってください:
- もしフレーム数が安定している場合、たとえば毎秒60から75フレームであれば、お持ちのグラフィックカードが、新しいフレームのコンピューター処理をする前に、モニターのフレーム表示の終了を待っていないことをチェックしてください。この設定は垂直同期信号(vsync)としても知られていますが、それを無効にしておきます。無効にするためには、グラフィックカードのメーカーによって提供されているコントロール・パネルを使い、エアロドラムのプロフィールを作成し、vsync設定を「オフ」にします。
- もし2つ以上のグラフィックカードをお持ちであれば(例:nVidia Optimus もしくは AMD Dynamic Switchable Graphics)、エアロドラムを実行する際に専用のグラフィックカードを使っていることを確認してください。これは、グラフィックカードのメーカー提供のコントロール・パネルでエアロドラムのプロフィールを作成することにより設定できます。
- 背景でプログラムが動作していて、コンピューター資源をエアロドラムと争っている可能性もあります。そのプログラムを閉じて、エアロドラムが必要なスピードで動作できるようにしてください。
上記を実施しても問題が解決しない場合は、お使いのコンピューターのグラフィック・ハードウエアがエアロドラムを演奏するために大変苦労しているということです。弊社はそういう問題があってもドラム演奏ができるように、速めのグラフィック・モードをいくつか用意しています。もっと負担の少ないグラフィック・モードは、control + g(コントロール・キーを押さえたままでgを押す)を押してひと回りすることができます。このようにして、一番お好きなグラフィックモードを選び、インジケーターが常にグリーンとなる演奏ができるようになります。
ここでは別の4つのグラフィク・モードについて説明します:
- スティック、足とペダルのゲージのみが動きますが、それは通常のモードのようにスムーズに動きます。
- すべてが動きますが、視覚的なスムーズさは通常のモードの3分の1です(もちろんドラム演奏は通常の表示モードの時と同様に速いスピードでできます)。
- グラフィックがもっと簡単になっている以外は上と同じであるモード。
- 画面に何も表示がなく、目隠しをしてドラム演奏をしているようなモードです。
4つ目のモードからcontrol + gをもう一度押すと、通常モードに戻ります。
WindowsオーディオAPI
「レイテンシー」画面のWASAPI APIのいずれかを選択できない場合、Windowsの音の構成を変更する必要があります。それを自動的にエアロドラムで行うことはできませんので、以下の手順に従ってください:
- コントロールパネルへ行く - 音 – プレイバック タブ
- お使いのプレイバック デバイスを選択し、「プロパティーズ詳細設定タブ」へ行ってください。
- デフォルトフォーマットのドロップダウンメニューから、 44100Hz rate (Shared WASAPIに必要)のフォーマットを選択してください。
- 「専用モードセクションで、両方のチェックボックスに印を入れてください (Exclusive WASAPIに必要)
Windows 8 オーディオ・グリッチ
弊社は、最近Windows 8が、コンピューターのハードウエアにいくつか問題があることに気が付きましたが、それがあると、エアロドラムの本来の演奏レベルに達することができなくなります。
この問題によって次のような徴候が出ます: 最初にエアロドラムをスタートさせ、デフォルトのオーディオ・バッファ・サイズ(サンプル数128)と、推奨されたオーディオAPI(WASAPI)を使うと、音が非常に歪んで出る。
この原因が、Windows 8のブルートゥースやWifiおよびオーディオ・ハードウエアへのリソースの配分の仕方である可能性が多いです。
これを解決するために、以下に従ってください:
- エアロドラムを終了する。
- Windows key + Cを押す、または画面の右端からスワイプしてチャームを開けてください。
- 設定のチャームを選び、PC 設定変更をクリックしてください。
- ワイヤレスを選んでください。
- ブルートゥースの設定をオフに変えてください。
- WiFi設定をオフにしてください。
- エアロドラムをスタートしてください。
- レイテンシー画面ではWASAPI Exclusiveを選び、オーディオ・バッファーサイズのスライダーで低い値を探ってみてください。
お使いのコンピューターにWiFiとブルートゥースのハードウエアの電源を手で切れるキーがあれば、Windows 8のインターフェースの代わりにそれをお使いになることをお勧めいたします。
以上を実施することによってエアロドラムのオーディオ・グリッチ/高いレイテンシーが修正できると、弊社が観察したほとんどのケースでは、Wifiを使えるようにした後もグリッチが戻ってくることはありません。
弊社ではこの問題をさらに改善できるように研究しており、どんな場合でもWindows 8でブルートゥースとWiFiをエアロドラムと共に使用できるようにしたいと考えています。
MIDIモード時のエアロドラムのオーディオ
お使いのコンピューターとサンプラー/DAWのオーディオ構成により、サンプラー/DAW が動作しているときにエアロドラムから音が聞こえてこないことがあります。「MIDI のみ」のモードの時でも使えると考えられる歌の再生、メトロノーム、 および、ドラミングメニュー・ナビゲーション音もそれに含まれます。
これは、お使いのサンプラー/DAW が、あなたのオーディオ・デバイスのレイテンシーを非常に低い設定にしたため、エアロドラムを含むどんなアプリケーションもそのデバイスを使えないためです。
Windowsの場合、もっとも一般的な原因は、お使いのサンプラー/DAW の音再生用に排他(exclusive) ASIO ドライバーを使っていることです。残念ながら、弊社がいろいろと試したポピュラーなスタンドアロンのドラムサンプラーはすべてASIOをサポートしますが、WASAPIはサポートしません。エアロドラムをリアルタイムで演奏するためにサンプラーを使う際に、レイテンシーを良くするためにどちらかのドライバーを選択する必要があります。もっとも人気のあるASIOドライバー であるASIO4All は排他モードです:アプリケーション一つで、所定のオーディ一オ・デバイス一つしか使用できません。もしこのような場合で、エアロドラムのオーディオが得られない時にその解決策の一つとして、二枚目のサウンドカードを、お使いのコンピューターにインストールまたは接続することです。一枚目のサウンドカードを使うためにお使いのサンプラー/DAWを構成する必要があり、2枚目のサウンドカードを使うためにエアロドラムを構成します。
もしお使いのASIO ドライバーが排他モードではない場合、または、お使いのサンプラー/DAW が共有(shared)WASAPI オーディオ出力をサポートする場合でも、オーディオ・デバイスとお使いのサンプラー/DAW のサンプリング・レートが、エアロドラムが使う44100Hz とは異なっているのであれば、同じ問題が起こる可能性があります。オーディオ・デバイスのセクションを見ていただき、お持ちのデバイスを44100Hzに設定するための指示に従ってください。
Macをお使いで、エアロドラムが音を鳴らすことができない場合は、サンプラー/DAWが、CoreAudioデバイスを、サンプルレートの変換(これは演奏を最大化するために時々行われます。)が必要な音を再生しない状態にしているためです。これを解決するにはオーディオ・デバイスとサンプラー/DAW が 441000Hzのサンプリングレートを使用できるように設定します。
- オーディオMIDI設定アプリケーションを開いてください。(SpotlightにMIDIを入力して探すことができます。)
- 現れてくるウインドーの左側の区画からオーディオ・アウトプット・デバイスを選択してください。
- 右側の区画にあるフォーマットドロップ・ダウンのリストから44100Hz を選んでください。
- お使いのサンプラー/DAWのサンプリングレートを 44100Hzに変更してください。
Transporting Aerodrums
We recommend that you re-use the box that Aerodrums came in to store or transport it. This will ensure that the tips of the drum sticks do not touch other surfaces. They are made of a fragile material and contact with other objects should be minimized.


Continue with Facebook
Continue with Google
To get Aered