This is the online manual for Aered, the sheet music editor for drummers. In the event that you can’t find what you are looking for here, you can ask a question on the forums.
In Aered, you can view a summary of the information contained here as an overlay onto the interface by pressing F2.
Note for Mac users: any appearances of Ctrl below should be treated as the Cmd key on a Mac keyboard.
Overview

Aered’s interface is divided into three main areas:
- 1 The editor pane is where you edit your music notation.
- 2 The layout pane provides a preview of the final typeset music and allows you to adjust formatting and add text.
- 3 The side menu gives you access to general operations such as opening and saving documents, undoing changes, adjusting preferences, etc.
The editor and layout panes are separated by a bar 4 that you can drag vertically to adjust the size of both panes. This separation bar contains two sets of buttons on the left and right. The left set pertains to the layout pane. The right set pertains to the editor pane.
The rightmost button on the separation bar lets you move the bar to the bottom of the window, making the layout pane use all the space. Clicking this button again (or pressing E) will restore the bar to its previous location, revealing the editor pane.
Editor pane
The editor pane is where you place and edit the notes that comprise your score. It is located in the bottom half of the window and displays all bars of music laid out one after another as a continuous scroll-able staff.
Navigation
You can navigate between bars by clicking the arrow buttons on the right of the separation bar (Cf. overview 4). Alternatively, you can press or .
When the mouse cursor is above or below the staff, it will transform into a scrolling symbol . You can then scroll the staff by clicking and dragging with the left mouse button. The Mac version also allows two-finger scrolling gestures to be used on the trackpad.
Entering notes
When you hover the mouse over a bar in the editor pane, Aered displays a preview of what the music will look like if you place a note at this location.
To place the note, click the left mouse button or press the space bar.
If you are entering a note on a staff line that depicts several drum tracks (e.g. snare and cross-stick on the same line), you can cycle through those tracks by repeatedly clicking on the note or pressing space.
To delete a note, click or press space repeatedly until it disappears. When returning the cursor to a previously placed note, the first click/press will delete it and subsequent clicks will cycle through the tracks. You can also delete notes by pressing Del.
By pressing a key while hovering a note, you can set it to be a ghost note G, accented A, a drag D, a flam F, or back to a normal note N. You can also set sticking that way: U for right and Y for left.
The status bar at the bottom of the window will show the current track for whichever staff line is closest to the mouse cursor.
Quantization
When Aered shows you a preview for the placement of a note at the cursor location, this preview is based on a subdivision of the bar into equal note values.
You can visualize this quantization with the time counting line that is shown above the bar.
To change the current quantization note value, you can use the note buttons on the right of the separation bar: (Cf. overview 4), or press the number keys:
- or 1: quarter notes
- or 2: eighth notes
- or 3: quarter note triplets
- or 4: sixteenth notes
- or 6: eighth note triplets
- or 8: thirty second notes
Manipulating bars
Underneath each bar, there is a row of buttons:
The buttons perform the following operations on the bar, from left to right:
- inserts an empty bar after this bar. I
- inserts a duplicate of this bar after it. B
- removes this bar. R
- adds/removes a quarter note to/from this bar’s time signature. [/]
- inserts a single repeat bar after this bar. C
- inserts a double repeat bar after this bar. V
- toggles a start/end repeat sign at the beginning/end of this bar. ,/.
- starts audio playback from the current bar without/with automatic scrolling. P/S
- (When using the keyboard shortcuts with the mouse cursor over the staff, the playback marker will start from the cursor location and can be repositioned by left clicking. During playback, Aered displays a stop button underneath the staff. You can also press Esc to stop the playback.)
- Centers the layout pane on this bar. L
Selecting notes
When the mouse cursor is over the staff, you can left click and drag to select a group of notes. Alternatively, pressing Ctrl +A selects all the current bar’s notes. You can then use the usual clipboard shortcuts to copy (Ctrl +C) or cut (Ctrl +X) the selected notes into the clipboard.
Once you have placed notes in the clipboard, you can preview what the bar would look like if you pasted the notes at the cursor location by pressing Ctrl.
If you then left click or press space while previewing (maintaining Ctrl pressed), you will commit the clipboard notes to the bar(s).
Sticking
You can indicate if a note is to be hit with the right or left hand: When hovering over a note, press U to label it as a right stick hit and Y for a left stick hit. These notes will then have their labels displayed automatically under the staff in the layout pane.
In the editor pane, when you change the label on any note, all right hit notes will be displayed in orange and all left hit notes will be displayed in green.
Layout pane
The layout pane is where you preview and adjust what the music will look like on the page. It is located in the top half of the window. You can use it to navigate through the music and to pick a bar to edit. It lets you fine tune the spacing between notes and adjust how many bars you would like to appear on each page. It also lets you delete, insert and duplicate bars. Finally, you can insert and lay out textual information such as a song title or other annotations.
Navigation
To navigate through your music, click and drag with the left mouse button to pan, and with the right mouse button to zoom in and out. The Mac version also supports trackpad gestures: two-finger scrolling to pan and two-finger pinching to zoom. You can also use the arrows on the left of the separation bar (Cf. overview 4) to scroll up or down one staff line at a time.
To automatically fit the current page(s) to the window, click the leftmost button on the separation bar, or press 0.
You can adjust the number of music pages that you want Aered to fit to the layout pane’s width using the and buttons on the separation bar, or you can press = and –.
To scroll the editor pane to a specific bar of music, double click on it in the layout pane.
Music spacing
The overall size and spacing of the music are controlled through the four sliders located on the separation bar:
The sliders are protected by a padlock button to their left that lets you avoid unwanted changes. From left to right, the sliders have the following effects:
- Controls the size of the staff with respect to the page.
- Adjusts the vertical gap between staffs.
- Controls how compact each bar should be. Low values make the bars compact, higher values increase the space between notes. This extra space is proportional to the duration of the notes.
- Adjusts the coefficient used to compute the extra space of slider 3 from note durations (this slider has no effect if slider 3 is set to 0).
The values of these sliders are mirrored in the page formatting tab of the preferences menu.
Manipulating bars
When hovering the mouse cursor over a bar in the layout pane, you can use the same keyboard shortcuts for the bar manipulation operations available in the editor pane. See the key reference section for a reminder of these operations and their shortcut keys.
In addition, you can perform clipboard operations on individual bars: press Ctrl +C or Ctrl +X to copy or cut the current bar into the clipboard. Press Ctrl +V to paste the clipboard contents into a new bar inserted after the current bar.
Line breaks
To insert a line break at the end of a bar, hover your mouse cursor over the bar in the layout or editor pane and press K. This will toggle a line break, which is visualized as a little boxed X above the bar line in the editor pane.
Text editing
Aered distinguishes between two types of text elements: song information and annotations.
The song information elements correspond to the bits of text that you would usually expect to find on a score. They are: title, subtitle, composer, transcriber and tempo.
Aered will lay out these text elements automatically (unless you reposition/resize them). Their content can be edited either from the general tab of the preferences menu or by double-clicking on them within the layout pane.
Annotations are other text elements that have to be placed manually. Unlike song information elements, these may span multiple lines.
To edit an existing text element, double click on it. Once you have entered your changes, click outside the text element.
To remove a text element, press R while hovering the mouse cursor over the element. (Song information elements can be re-created from the preferences menu.)
To move a text element, click and drag it with the left mouse button.
To adjust the size of a text element, click and drag it using the right mouse button.
To create a new annotation, place the mouse cursor at the desired location and press T.
By default, annotations can overlap with the music. To toggle overlap prevention, press O while hovering the mouse cursor over the annotation. Staffs are automatically displaced vertically when overlap prevention is activated on an overlapping annotation.
Side menu
This menu serves the purpose of a standard file menu, plus a few extra functions. Here is a description of the buttons in order of appearance:
Preferences
The preferences screen is reached from the side menu by clicking . It is divided into five tabs: general, audio, drum samples, notation key and page formatting.
You can save your preferences, restore them or reset the preferences to defaults using the buttons at the bottom left of the menu.
General
Here you can input information about the song you are working on, such as title, composer, etc. Unless the corresponding text elements have been deleted from layout pane, this information will be used by Aered to automatically lay out the score’s header. If you have made manual adjustments to some of the header’s text elements and now want to reset the layout, you can click the reformat annotations button.
When you import ascii tabs ( in the side menu), Aered can give you feedback on which parts of the file it could not interpret. This is done by producing a log file containing a copy of the file you picked for import in which each line that caused problems is commented with the likely cause of the problem. To enable this, tick the Save log file checkbox.
By default, Aered places the log file (annotated-tab.txt) in its own directory. You can change this using the Log file location field. If an ascii tab import encounters problems and a log file is generated, Aered loads it into your default text editor. You can disable this by unchecking the Automatically open log file after import checkbox.
Aered ignores the comments it places in the log file, so if you find it convenient, you can correct any problems directly in that file and pick it as the file to import in your next attempt.
You can refer to the Importing ascii tabs section of this manual to find out what modifications to make to help Aered import a file successfully. There is unfortunately a large variety of ascii tab styles and Aered cannot make sense of them all without a bit of help.
In this section you can toggle the display of a grid that is aligned with the time count line. This is the grid to which notes will “snap” when editing music. You can also toggle the display of bar numbers in the editor pane.
Audio
This tab lets you adjust the relative volumes of the drum samples, click track and song during playback. You can also toggle the click track on an off, as with the M key.
In this section you can browse for a song file for playback (.ogg/.mp3 on Windows; .ogg/.mp3/.mp4/.m4a/.aac/.aiff on Mac). The Start offset field lets you synchronize the song file with the sheet music by specifying the number of milliseconds into the song from which it should start playing back. Alternatively, by specifying negative offsets you can delay playback of the song.
We have plans to build automatic synchronization features into Aered in the near future, but until then you can obtain accurate offset estimates using a beat detection program.
Drum samples
This tab lets you customize the drum samples that Aered uses for playback.
You can navigate through different categories of drums/cymbals using the checkboxes at the top of the tab.
Each drum/cymbal has two edit boxes corresponding to samples to use for left and right hands, if applicable, or else two variations which Aered will alternate between. In the case of hi-hats, currently different samples can be specified for fully open, half open and closed hi-hats.
For each edit box, you can type a path to a folder containing one or more wav files, or browse for one by clicking the button at the end of the line. If the folder contains more than one wav file then Aered will load all of them and pick the sample whose volume level best matches the desired volume (i.e. ghost/normal/accent) each time that drum/cymbal needs to be played.
If, instead of specifying a path to a folder, you write the text “<default>” into an edit box then the built-in samples will be loaded. Note that default samples are not available for “Kick 2“, “Rimshot” and “Crash 3” and, in some cases, samples are provided for the right hand only. Also note that, to decrease sample loading times, Aered does not load all available samples by default. In particular, samples are not loaded for “Kick 2“, “Rimshot“, “Very High Tom“, “Floor Tom 2“, “Hi-hat Splash“, “Crash 2“, “Crash 3“, “Splash“, “Splash 2“, “China“, “Cowbell” and “Tambourine“.
For each pair of edit boxes corresponding to a drum/cymbal, if you leave one of the edit boxes blank then Aered will use the samples from the other edit box. For example, if you specify snare samples for right hand only then left hand hits will also use the right hand samples.
Finally, note that the sample folders in this tab are not saved in Aered files (*.aer) since this would make them potentially dependent on external data. Instead, any Aered file you load will use the sample folders that are currently set.
Notation key
You can use this tab to assign each drum/cymbal to a specific staff line and to pick the symbol used to represent it.
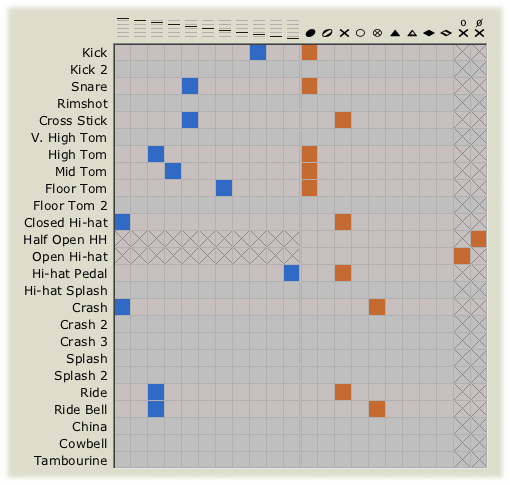
Each row of the notation key table represents a drum or cymbal. There are two groups of columns: in the left half are the line columns, on the right are the symbol columns.
To assign a line to a drum or cymbal, find the column corresponding to the desired line then click the cell whose row corresponds to the drum or cymbal.
Similarly, to assign a symbol to a drum or cymbal, find the column corresponding to the desired symbol then click the cell whose row corresponds to the drum or cymbal.
Unlike the sample folders described in the previous section, the notation key is saved inside each Aered file. This means that when you open an Aered file, you are guaranteed to see the exact same sheet music as when the Aered file was last saved, irrespective of how your notation key is currently configured. Remember that, as explained here, you may not hear the same result as when the Aered file was originally authored as the sample folders are not saved inside Aered files. For example, if you open an Aered file that uses a cowbell in the notation key but you have no sample folders specified for “Cowbell” then you will not hear any cowbell during playback.
Page formatting
The checkboxes in this section let you control numbering options for pages and bars.
You can enter values for left/right and top/bottom margins here.
This section lets you adjust the staff size relative to the page (Staff width) and the vertical spacing between staffs. The staff layout can also be controlled using the first two sliders on the separation bar (Cf. overview 4).
Here you can adjust the spacing between notes. Aered has two modes to compute this spacing. The first one uses a preset small space between notes to yield very compact bars while ensuring no overlapping symbols. The second one places a space after each note that is proportional to its duration. The space left after the shortest notes is also bigger than the space left in the compact mode.
The Blend factor parameter controls the influence of either modes described above on the final layout of each bar. A value of 0 gives the most compact bars, where notes are evenly spaced regardless of duration. The greater the value, the roomier the bars, and the greater the spacing variations between notes of different durations.
The Duration factor parameter sets the coefficient used by the second mode to determine how much extra space to leave after a note. The greater the value, the more the spacing is affected by note durations.
You can also adjust the note spacing with the last two sliders of the separation bar (Cf. overview 4).
Key reference
General keys
- Help: F1
- Toggle help overlays: F2
- Collapse/expand editor pane: E
- Start playback with/without scrolling: S/P (starts from mouse cursor location)
- Stop playback: Esc
- Toggle metronome: M
Current bar (in either editor or layout pane)
The current bar is the one that your mouse cursor is hovering over.
- Insert empty bar after this bar: I
- Insert duplicate bar after this bar: B
- Remove this bar: R
- Decrease/increase number of quarter notes in this bar: [/]
- Repeat this bar using simile mark: C
- Repeat this bar and previous bar using simile mark: V
- Toggle left/right repeat sign for this bar: ,/.
- Insert a line break after the current bar: K
Editor pane keys
General
- Set current quantization (note value used to subdivide bars):
- Quarter notes: 1, eighth notes: 2, quarter note triplets: 3
- Sixteenth notes: 4, eighth note triplets: 6, thirty-second notes: 8
- Scroll left/right: /
- Next/previous track: X/Z
- Center layout pane on current bar: L
- Resize current bar: hold Q + move mouse left/right
- Reset current bar’s size: W
Over a note
- Accent note: A
- Normal note: N
- Ghost note: G
- Toggle flam: F
- Toggle drag: D
- Delete note: Del
- Label note as right hit: U
- Label note as left hit: Y
Selection
- Select all notes in current bar: Ctrl +A
- Copy selection: Ctrl +C
- Cut selection: Ctrl +X
- Paste selection: Ctrl +V (at mouse cursor location)
- Delete selection: Del
Layout pane keys
- Scroll up/down: /
- Frame pages to fit inside layout pane: 0
- Decrease/increase number of pages shown horizontally: –/=
Annotations
- Insert annotation: T
- Remove annotation: R (over an annotation)
- Toggle whether annotation can overlap staff: O (over an annotation)
Selection
- Copy current bar: Ctrl +C
- Cut current bar: Ctrl +X
- Paste after current bar: Ctrl +V
Side menu keys
- New Aered document: Ctrl +N
- Open Aered file: Ctrl +O
- Save Aered file: Ctrl +S
- Undo/redo: Ctrl +Z/Y
Website features
We started a database of community contributed sheet music made with Aered at aerodrums.com/aered/tabs.
All files are freely accessible either in Aered’s format for further editing, or as pdfs.
You can contribute music you have edited with Aered to share with other drummers.
Registering / activating your paid copy
When you purchased Aered, we displayed a registration code on the payment confirmation page.
Here is how to use the code: In Aered, click the second button from the bottom in the left column ( ). Now in the ‘About’ page that appears, enter your code in the input field.
If you have lost your code or did not make a note of it, please email support with your payment receipt. We are sorry for this inconvenience.